Services Installation General Instructions
Install the installer and open wizard web-app https://posow.erply.com/. Go to the Hardware -> Installer App -> Installation.
Download the installer for your system. Only one version should be installed. If you are not sure what version to download, use the first step in wizard’s installation section: Download Installer app executable from here.
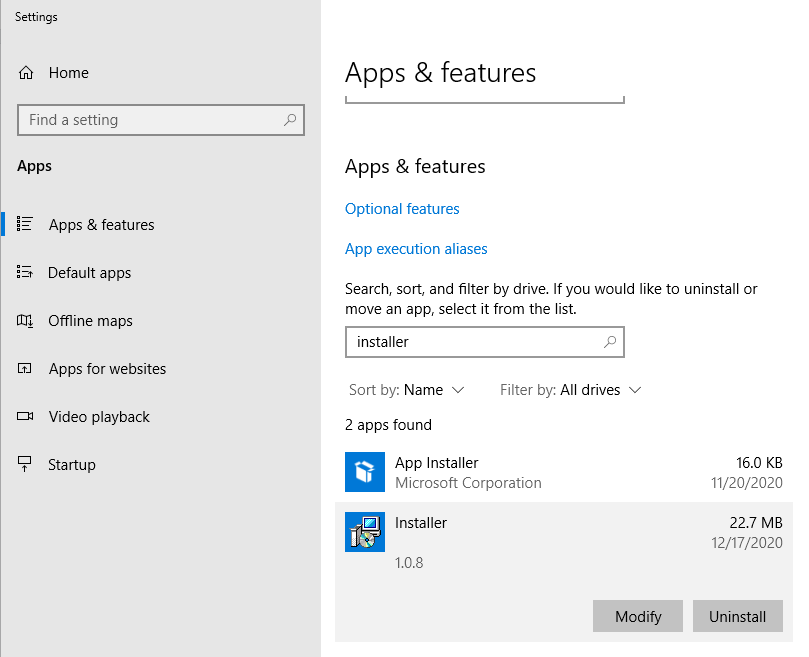
Before installation, check that Installer is not installed (in add/remove programs). If the installer already exists, remove it from Apps & Features section and reboot the PC.
Install the installer by doubleclicking on the downloaded file and follow the instructions (it will be installed and started automatically in most cases, if users machine is not configured to not execute services automatically).
Go back to the wizard and test connection with the installer. Green box should show the version.
If connection was established then update the installer to the latest version by clicking on “Update Installer” button and click the test connection button, the green box should show the latest version.

Known issues: If there is unstable internet connection, then updating may fail as well as the installation of the specific service. In such cases the folder, that should contain the service files (e.g. C:\Program Files\Erply\printing-microservice\v2.1.21\), will contain only zip file with 0 size. All what user can do is trying to install the service again and again or change internet connection.
Install services and open wizard web-app https://epos.erply.com/. Go to the Hardware -> Installer App -> Micro-Service Manager -> Add New Micro-Service and select the required service from the dropdown menu.
Click the Continue button, located in the right bottom corner.
Select version and click Install, the service will be downloaded and started automatically, if not, try to refresh the page and start it manually by pressing the green Start button.
Configure installed services in wizard (if needed)
Open wizard web-app https://posow.erply.com/. Go to Hardware -> Integrations. Select level for the configuration (Company level will be applied for all POSes in the company)
Select required integration type (e.g payment) and click Continue.
Select integration name and click Add, if the integration is already in the list below, click on the specific integration name to change the settings.
Some integrations may require additional configuration that are not included in the POS settings. In this section you can set these configurations.
After all required fields are set, Save the changes.
Configure Installed Services in the POS
Open the POS web-app https://epos.erply.com/ and go to Settings -> Payment Configuration (or Printing Configuration). For Payments select Setup payment gateways and choose preferred integration from the dropdown list
Populate fields with the required data, update settings (in most integrations also possible to test the connection with the device), and save. Try payments/printing.
Printing Service Installation Instructions
Currently supported only Epson, Star, Clientron and Bixolon printers.
Install drivers for printers.
Before printing service installation, install required drivers for printers:
Epson: https://epson.com/Support/Point-of-Sale/Thermal-Printers/sh/s530
Star: http://www.starmicronics.com/support/default.aspx
Bixolon: https://www.bixolon.com/support.php?kind=download
Clientron: https://www.clientron.com/en/goods.php?act=view&no=57#tab-3
Check that the driver installed correctly by printing the test page from Printers and Scanners window.
Configure the printer in wizard.
Go to the printing option while in the configuration section (see steps described above for locating the printing configuration page) and select Golang printing micro-service.
After service selection, the settings screen will appear.
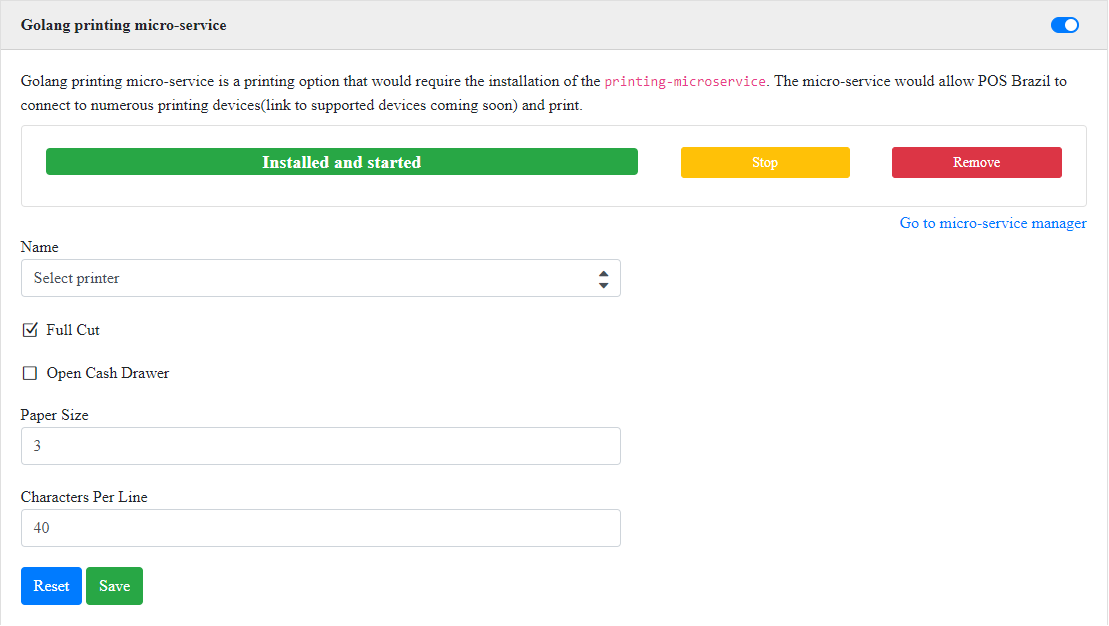
If the printer was installed properly and supported by printing service (star, epson, bixolon), the name of it should appear in the Name select field. Select it and save the settings (Optionally, you can enter paper size (2 or 3) or Characters per line). Selecting Open Cash Drawer option will trigger the cash drawer opening each time when printing is requested (after printing the receipt)
Characters per line may be set to 0, in this case default values will be used (bixolon: 3”=42, 2”=28; star and epson: 3”=48, 2”=36). Change this field only if the printing layout doesn’t fit into the receipt. Try to set smaller or bigger amounts until you reach a suitable result.
Layouts of the receipt can be configured from the POS Settings in the Debug section. There is a schema editor.
Troubleshooting Known Issues
Solving issues: If wizard indicates that service is not installed or started, after performing mentioned above steps, then try to locate the service name in Services windows tool
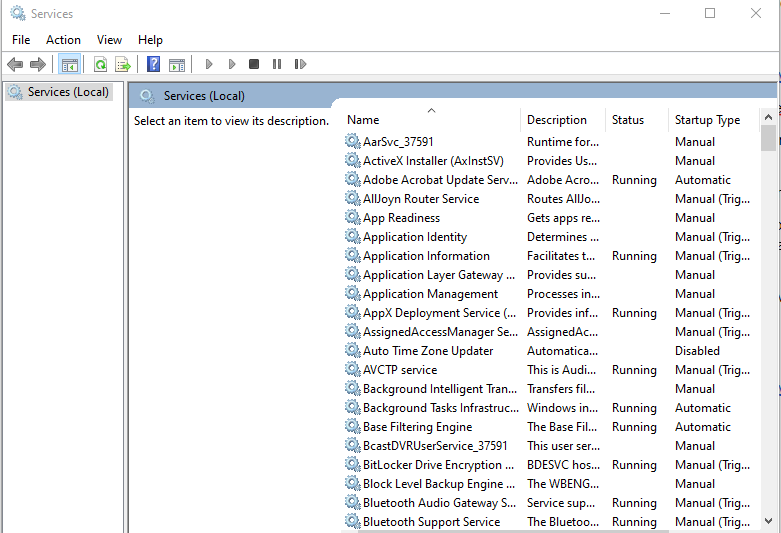
If you can find it then check that it is running. If there is no service, try to install it again. If there is service but it is not running then try to run it from services (right click on service name and Run). If the service name remained in the services tool after removing it, then refresh the list and if it is still there then reboot the PC.
Additionally, when it is not possible to remove the microservice, open Command Prompt by typing cmd in to windows search and right click it to run it as admin.
Insert command “sc delete printing-microservice (name of the microservice that you see in Services)”
Now that the microservice has been removed as a service, go to the Erply folder in: C:\Program Files\Erply and delete the microservice folder that needs to be deleted.
Install the microservice again using the microservice manager.