Customer Display configuration
Before starting using the Customer display application it can be configured by the user's needs and wishes. In this articket you will find:
- How and where can the Customer display be configured?
- What do the configuration settings affect?
Where can I configure it?
- Log in to the Brazil POS , enter your credentials (client code, username, password).
- Click on the “gear” icon (POS settings) - select Plugins - Find out the “Customer Display” plugin
- Click on the “Configure plugin” yellow button

Start configuring your own Customer display:
Channel code
1.Click on the yellow “Generate channel code” - since the information that will be displayed on the customer´s screen, the POS register and the customer´s screen must be connected by a code. The code which is currently active and can be used is located under this yellow button

2.When the channel code was generated click on the “Open external customer display”
3.On the Customer display make the entering code input field active
4.Using the numpad enter the channel code which was generated previously in step 1.
5.Click on the green Start button
External display configurations
Workflow configuration
1.Select the “Show row discount as percentage” to display discounts in the shopping cart in %. Disable setting to display discounts in the shopping cart in currency.
| Setting is disabled | Setting is enabled ✔️ |
 |  |
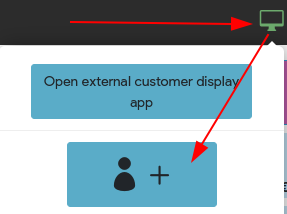
2.Enable the “Accepting customer creation form opens the form in POS '' option. Then click on the green “screen” icon in the POS menu bar, then click on the “Sent customer form to the display” button (person and “+” icon):
The customer creation form appears on the Customer display and customer is able to fill out all the required fields
3.User is able to select what will be happening after the transaction is done.
Here is four options that can be selected:
- No extra action
- Show email input
- Show QR code with receipt link
- Show QR code with custom link
| “Show email input” | “Show QR code with receipt link” | “Show QR code with custom link” |
 |  |  |
4.If something has been configured or changed click on the “Save workflow configuration” button in the Workflow configuration section.
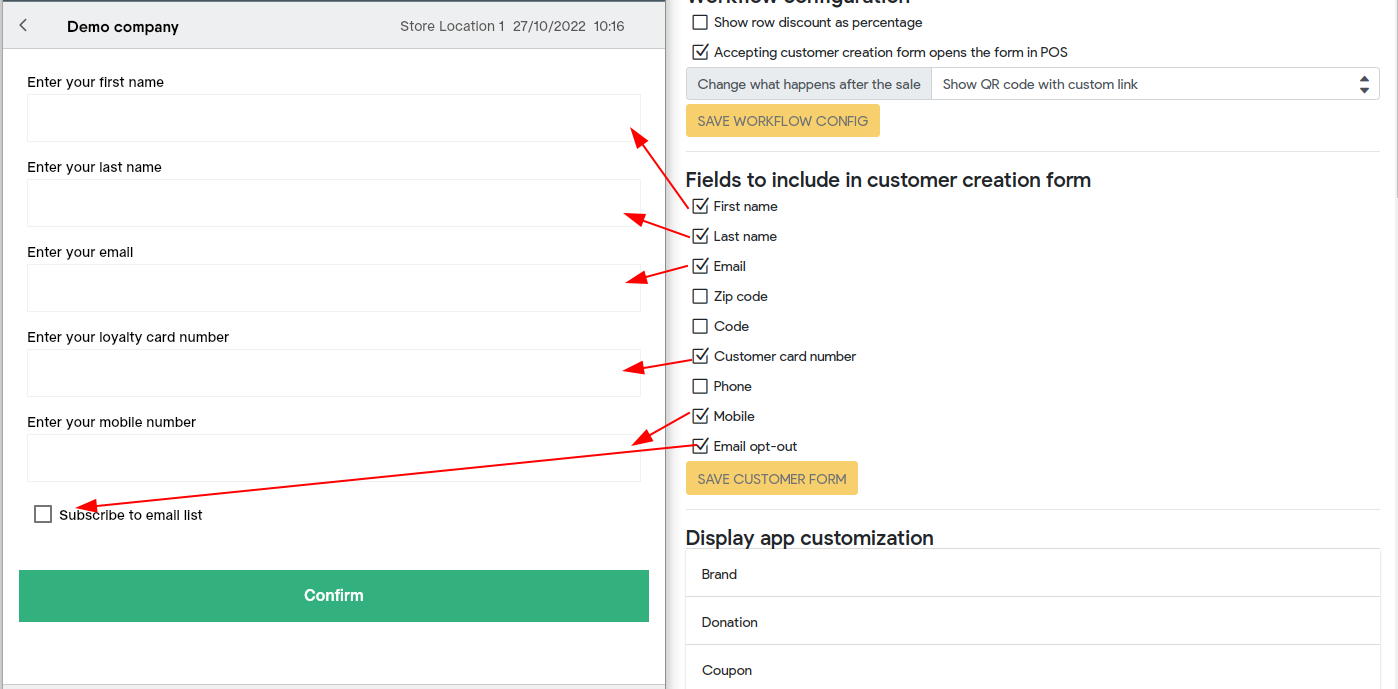
Fields to include in customer creation form
1.Choose and select fields that you would like to have in the customer creation form on the customer´s display:
2.If something has been configured or changed click on the “Save customer form” button.
Display app customization
In this section you are able to set up titles and button names which will be displayed on the Customer display.
Note: if you have configured any fields, select the check box that enables the current setting. Otherwise changes won´t be displayed on the Customer display and values will be taken from another configuration level.
- Brand:
“Text” - enter here the company name which will be displayed on the customer´s display

“Logo link” - add a logo web link here, which will be displayed on the customer´s display
“Logo type” - designate the picture format (JPG/PNG/JPEG/GIF)
- Donation -
- Coupon
- Customer lookup
- Customer registration
- Customer chek-in
- Product upsell
- General
- Settings
Configure fields (if it is needed) and save changes by clicking on the “Save Configuration” in each section.
Click on the “Reset configuration” button if you need to clear all the settings in this section and start configuring from the beginning.
Custom ads
The user is able to add advertisements, promotion pictures, animations - every illustrative information - to the customer´s display. By this way you can help to promote in a simple way!

That to add advertisements to the customer´s display please follow next steps:
- Go to the POS settings (gear icon on the menu bar)
- Go to the Plugins - “Customer display” - configure plugin button
- Scroll down to the “Custom ads”
- Select type of illustration: IMAGE or VIDEO
- Select ilkĺustration format: GIF, JPEG, PNG, JPG (it can be checked from the illustration parameters)
- Paste the illustration link to the Source field
- Set up the duration period
- Red bin button that to delete current advertisement
- Click on “Save ads” button if you have added an advertisement and want to display it on the customer´s display
- Click on the “Add new ad” button if you want to add additional advertisement
Customer display application allows users to add multiple illustrations. If the few illustrations were added they will change each other depending on the time set in the settings (duration field).
Font

In the font section it is possible to set up the font size and thickness on the customer´s display summary section (at the bottom):
- Enter the numeric value to the Font size field or switch size numbers using arrows (font size must be between 14-60)
- Select the font thickness in the Font weight column.
- Click on the “Save conf” when you have configured this section.

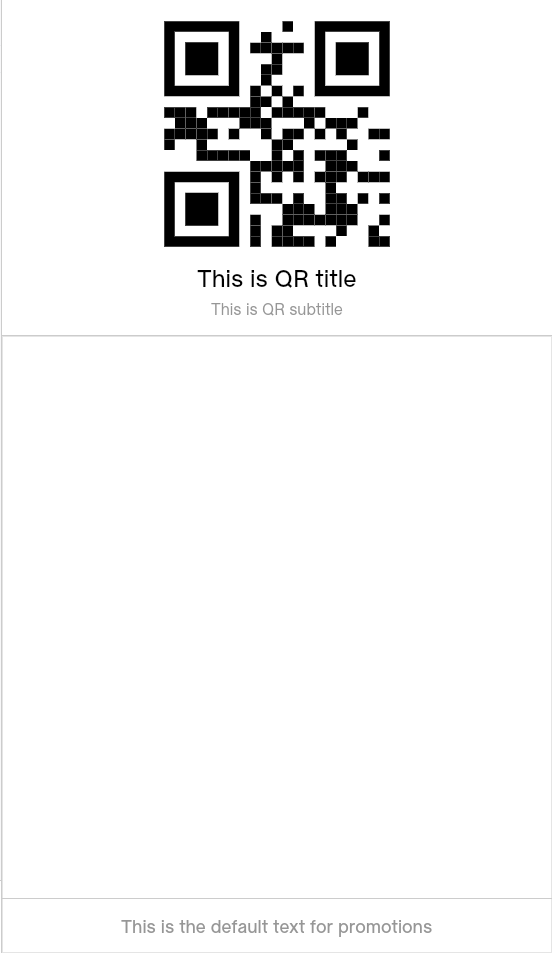
QR code
When the transaction is finished the customer will show the QR code. The code can include any information that could be useful for customers (for example, website).
How can it be configured?
- Go to the POS settings - Plugins
- Search for the “Customer display” and click on the Configure plugin
- Scroll down to the QR code section and fill all the fields:
- Title - the primary QR code title
- Subtitle - the secondary (smaller one) QR code title
- Timeout - set up time out in sec when the QR code will disappear.
- Data - add a link into this field which will be hidden in the QR code and appears when the QR will be scanned.
- Click on the “Save QR config” if it is configured.

