Welcome to Inventory.com!
Inventory is a webshop platform created as a free addition to Erply, our ERP system. All product, customer, pricelists, warehouse, company etc., information is located in Erply and synced to Inventory.
You can log in to Inventory’s admin with the same credentials you use for Erply login.
For logging in, use this address: admin.shopz.com.
With Inventory-related questions, please get in touch with us at: order@shopz.com.
After logging in to the admin panel, You are presented 4 options:
1. Edit my store’s design - directs You to theme and component editor
2. Change store settings - directs You to store settings (delivery and payment methods, checkout settings, general shop settings etc.)
3. Import products - redirects You to Erply, where You can import Your products
4. Any questions? - redirects You to Erply’s Wiki page, where the common questions should find the answers
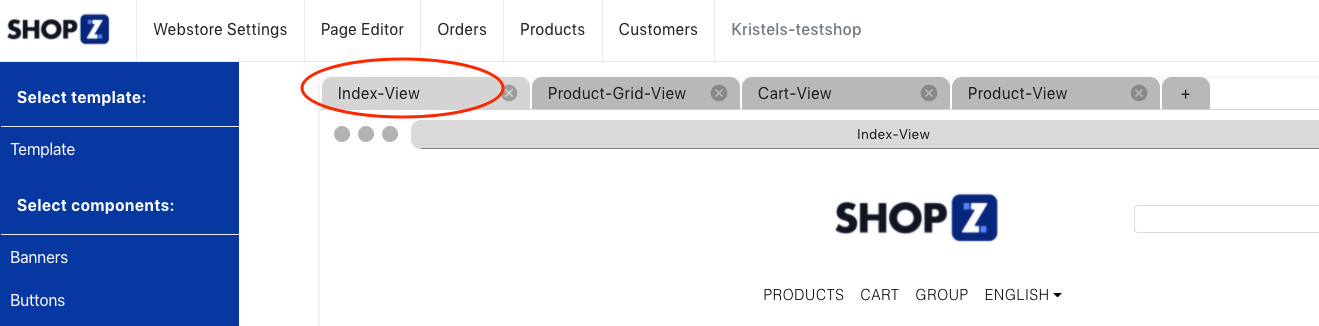
EDIT MY STORE’S DESIGN aka Page Editor
Here You can find the theme and components editor, with what You can create a design for Your store.
In the left sidebar, You can find all available components that can be dragged onto a page that is currently active (marked as light gray):
On the right side, there’s a settings bar that appears after a specific component is selected:
If no component is currently active (selected – this is indicated by the light blue background as seen above), then the right sidebar settings are applied universally to the whole shop. For example, if You want to change the text size in a component, You must first click on a component and then change the text size. If You want to change the text size throughout the shop (not in one component only), then change the text size in universal view without previously clicking on any component.
Components:
Template - all the available pre-defined templates that You can choose from (currently 1)
Banners - full-width banner with text
Buttons – button, can be linked
Fields - different fields for different purposes. For example, if You want to add an image to the page, then click on “image field”. Layout field can be used when You want to use multiple
columns on one row. In that case, You must:
1. Add the layout component to the page
2. Click on the layout component on the page
3. In the right sidebar, click on “columns” and choose how many columns You need on one row
4. Drag and drop components from the left sidebar inside the layout columns. If You want f.e 3 images next to each other, then drag 3 image containers next to each other, one by one, to the layout field.
Video field - can be used to display Youtube videos. You need to enter Youtube video ID, which is defined in the Youtube video link (the last part of it, that comes after “v=”)
Group grids - this can be used to display product groups or collections on one page. You can also add images to groups in Erply.
Image containers - different combinations of images and text
Layouts - one pre-defined layout with two columns for the use-case, where You want to add a sidebar next to the product grid
Navbars - two different navigation bars
Newsletters - two newsletter boxes that could be used within a layout column
Page footers - the bottom part of the page
Page headers - the top part of the page
Product filters - a possibility to add filtering to product grid view
Product grids - different views for displaying product group products
Sidebars - possible to add to the product grid view to show product groups tree or B2B functionalities
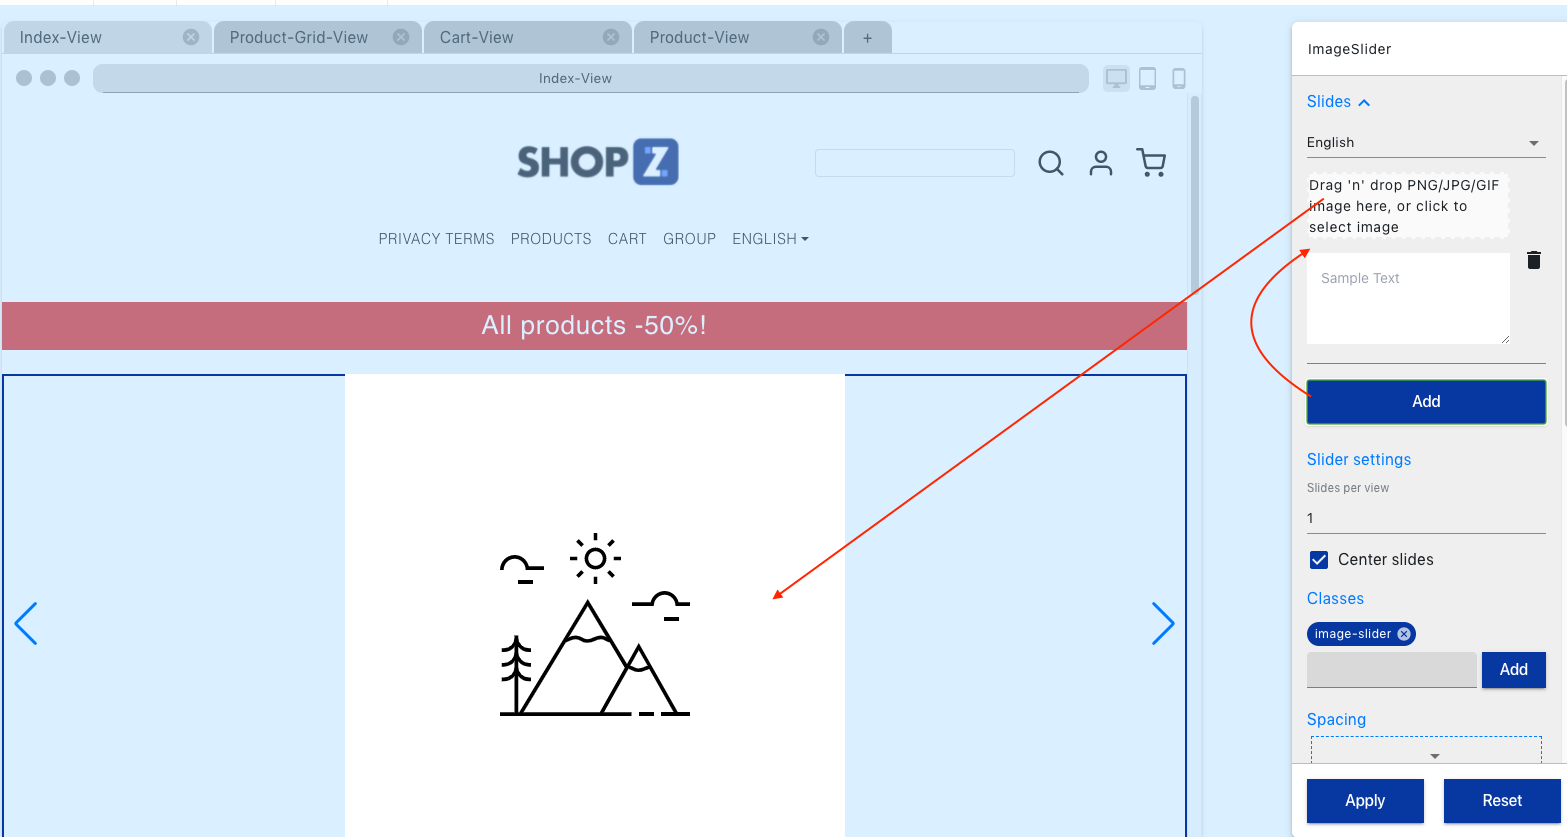
Sliders - image sliders. The second slider is mainly used. When You click on the slider component, settings will appear in the right sidebar. From there, You can add more slides and under slider settings decide, how many slides per one view are shown (typically 1).
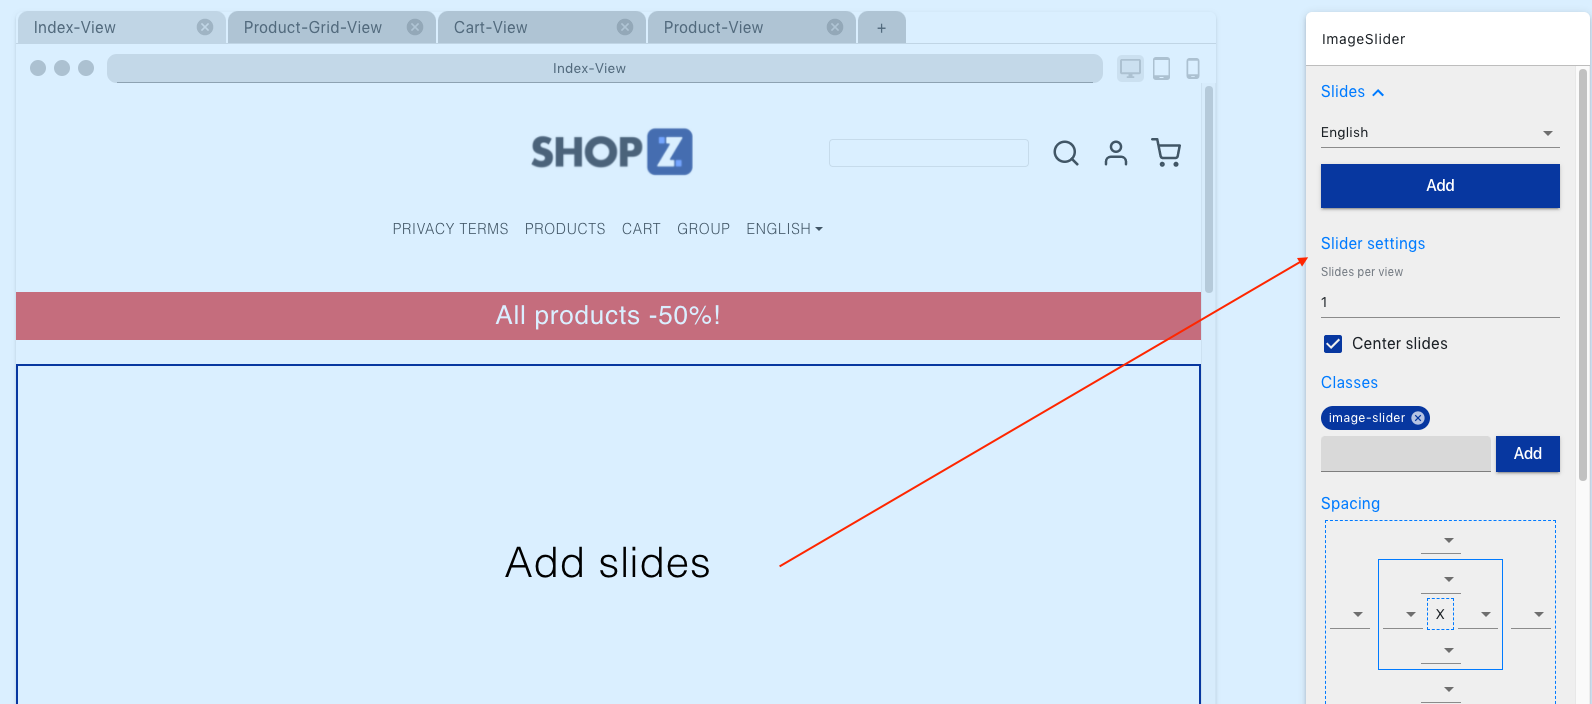
Once You click on “Add”, You get to add an image and text for the slide:
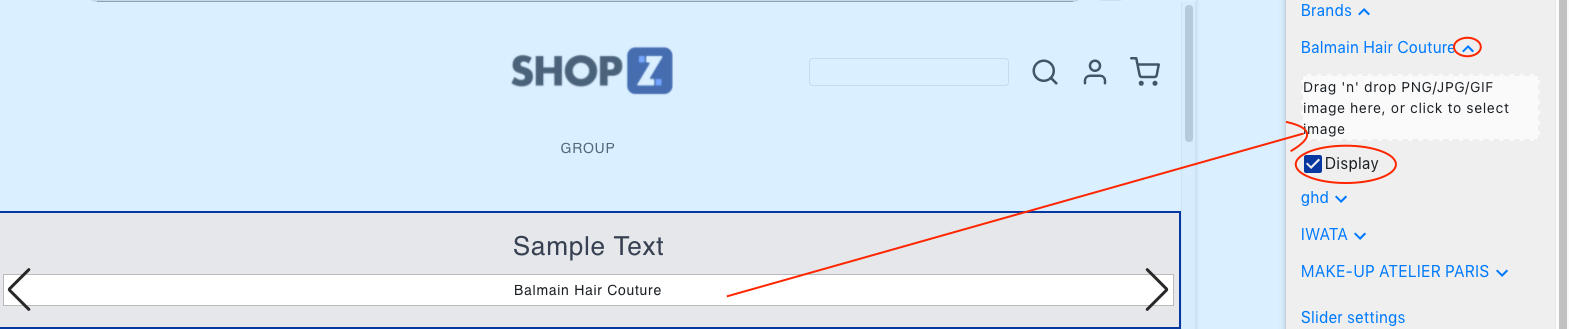
The last item there is a brand slider. Brand slider pulls all brands from Erply to Inventory, and within this component, you can decide which brands you would like to include in the slider. For that, You need to click on the white section of the component, which opens a right side settings menu. From there, You can choose whether to display a brand or not (untick or tick) and add a logo image:
Clicking on the text section of this component allows You to add a heading for the section.
When a customer clicks on a brand logo/name in the shop, they are redirected to a page that displays only products of that brand.
Text boxes - different style text boxes or combinations of text + image
PS! When making changes in design, first click “Apply” and then “Save”.
If You can’t see the changes You saved in the webshop’s view, please try at least one of the following:
- Hard refresh (Ctrl + Shift + R / Command + Shift + R)
- Clearing the browser’s cache manually via settings
- Using incognito mode (Ctrl + Shift + N / Command + Shift + N)
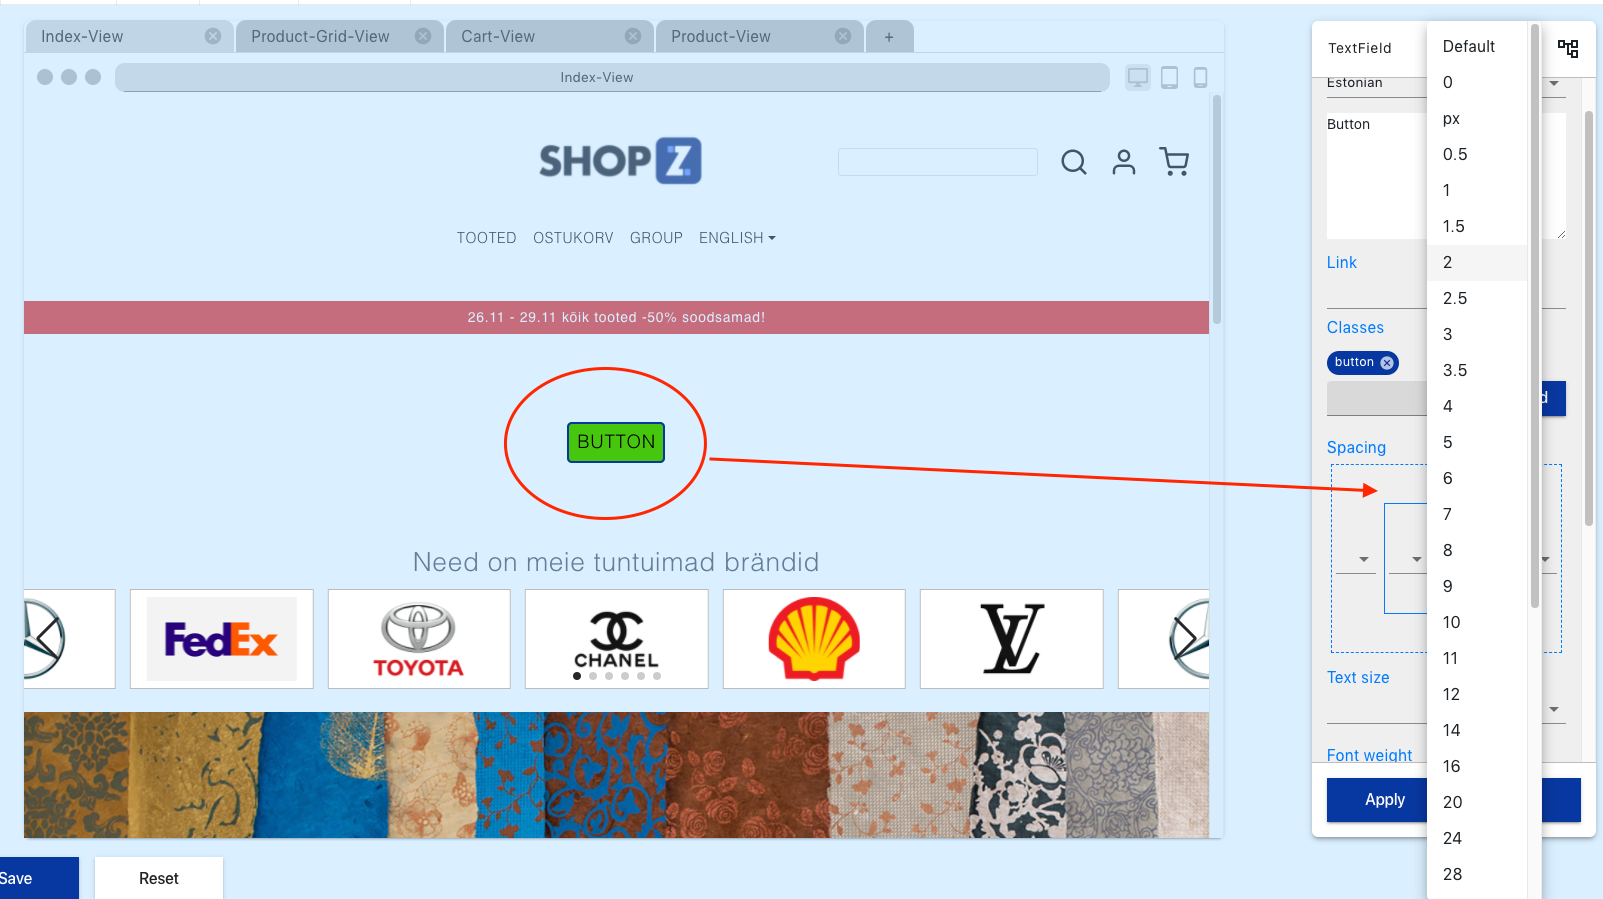
You can also add padding and margin to the different components. This works inside the element and between different components. For example, if You added a new button and want the text inside the button to have more space around it, click on the button component and add padding:
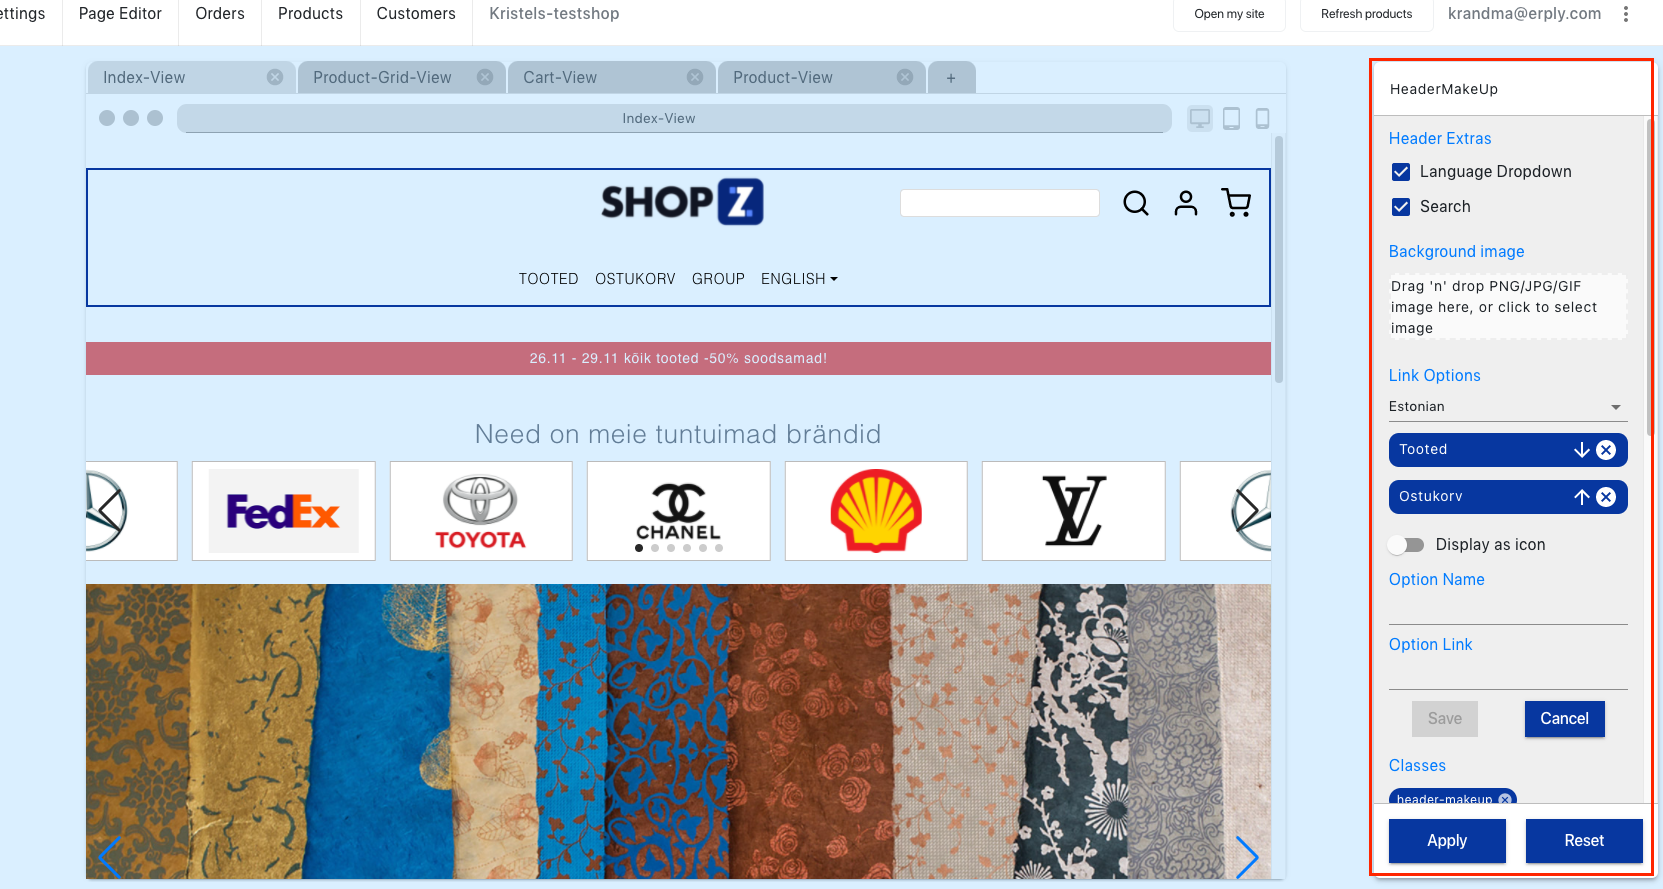
HEADER AND FOOTER SETTINGS
Clicking on a header or footer component will open settings in the right sidebar. Different components might have slightly different settings.
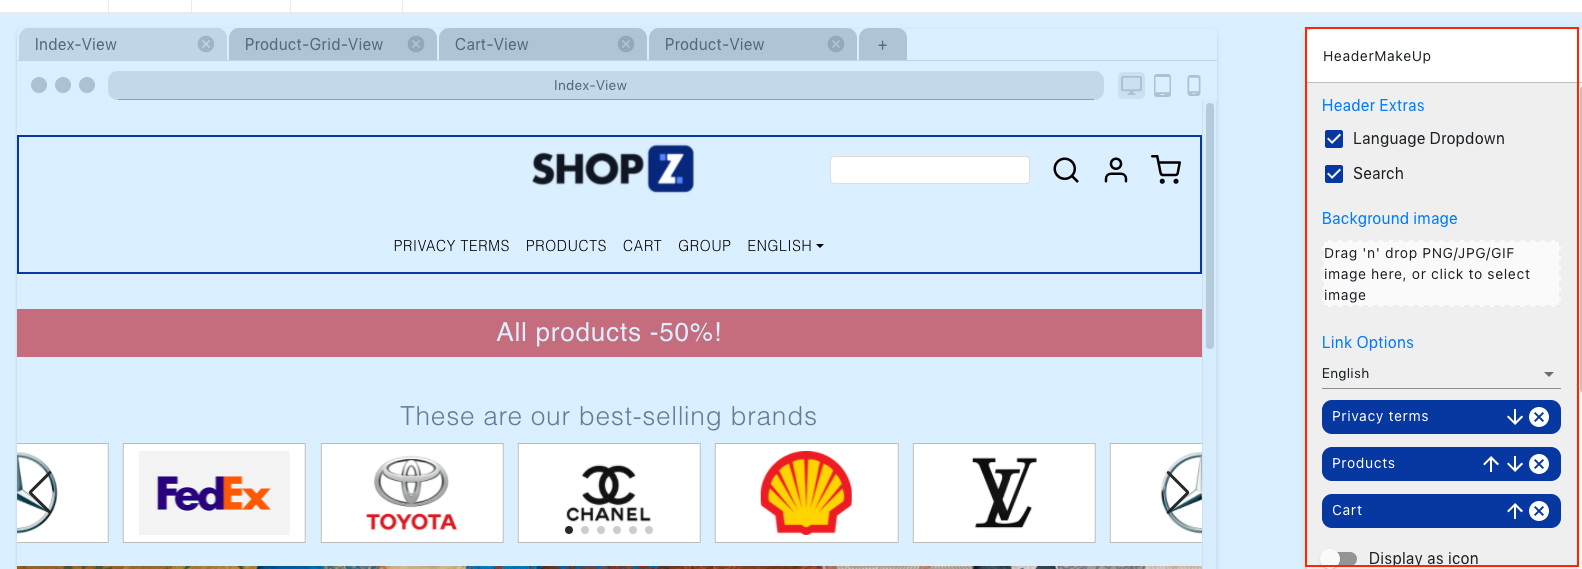
Ticking “language dropdown” adds an option to choose languages to the shop (only in the header).
Ticking “search” adds a search bar (only in the header).
Background image – You can add a background image to the header.
You can change the order of menu items (links) using the arrow icons, or delete them using cross icons.
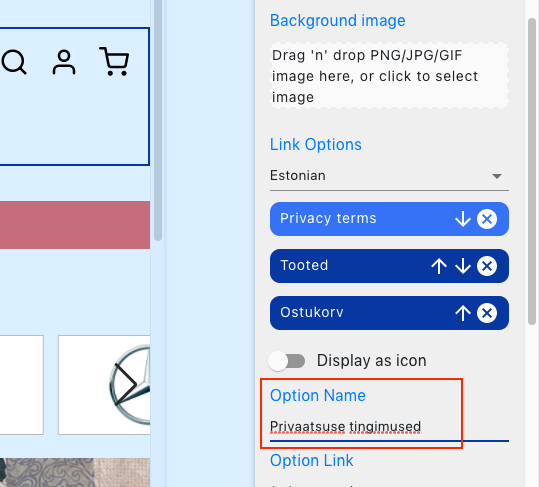
“Display as icon” – You can click on a menu item and choose to display an icon instead of text. F.e instead of showing the text “Shopping cart”, You can show the cart icon.
TRANSLATION
If You have a text-based component or header/footer menu in a webshop with multiple languages, You’d need to translate the text parts.
1. Translating text-based components
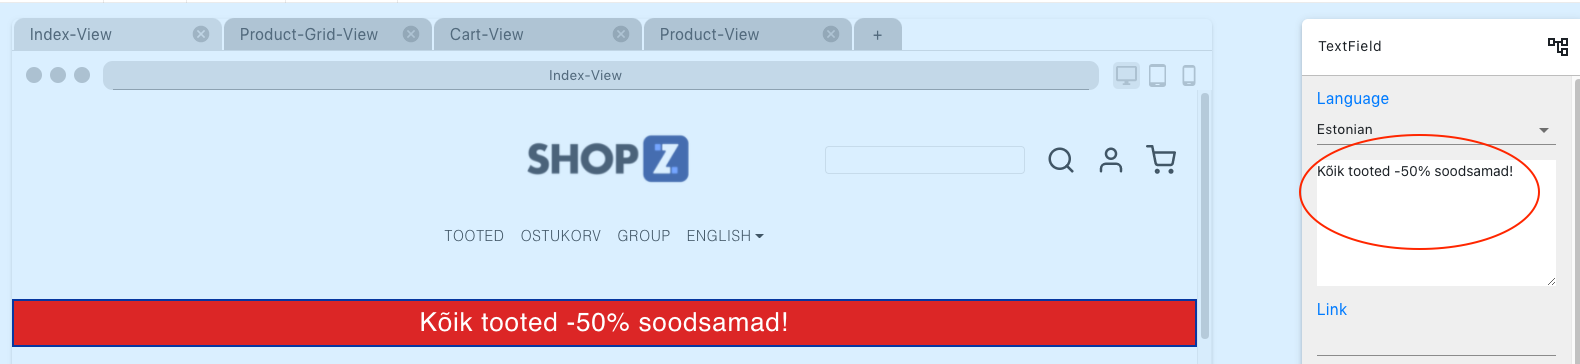
First, You have to select a component that You want to translate. Let’s take this sale banner, for example. When You click on it, a right sidebar menu will open:
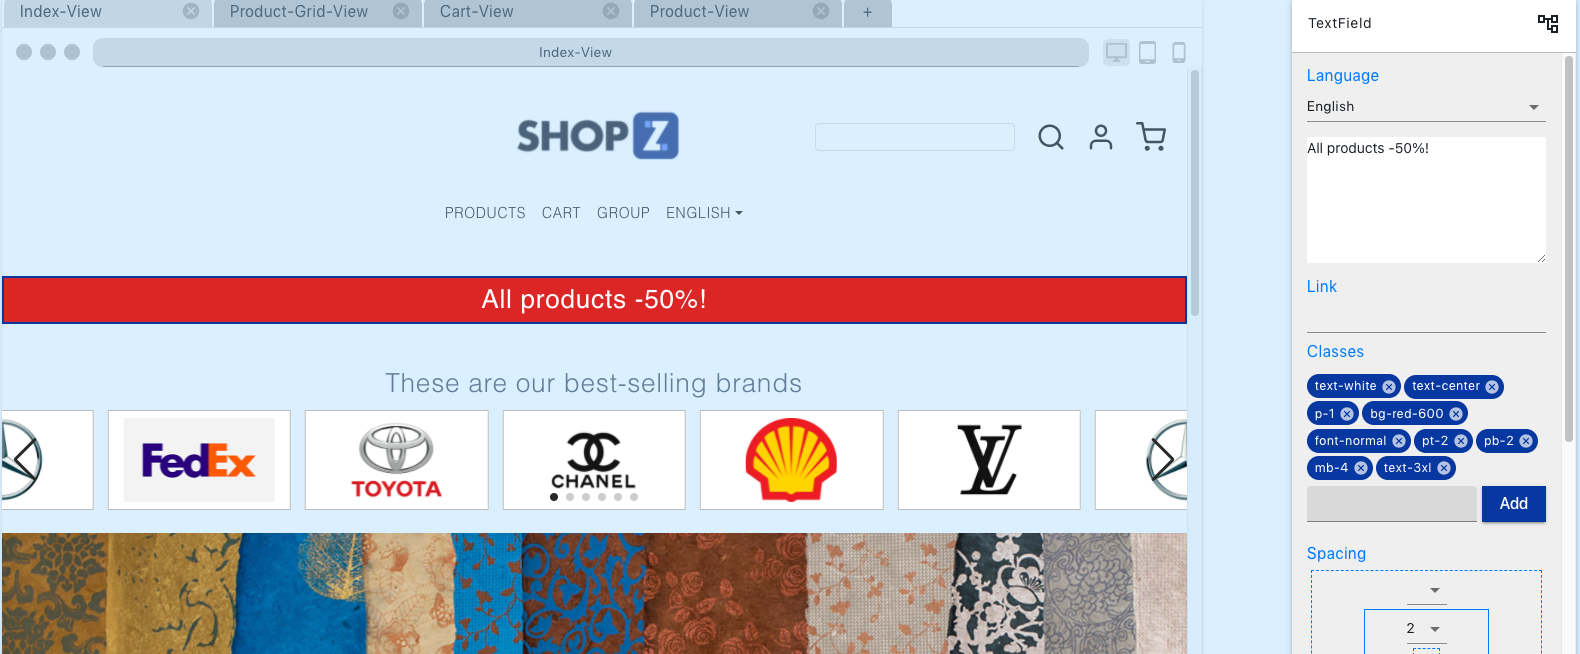
From the “Language” dropdown, You should choose into which language would You like to add the translation.
After that, enter the translated text into the text box below and save:
Repeat with all enabled languages.
2. Translating menu items
Start by clicking on the header component. To the right side menu, “Link options” will appear.
Choose the language You would like to translate the menu items to.
Menu items are listed with dark blue background:
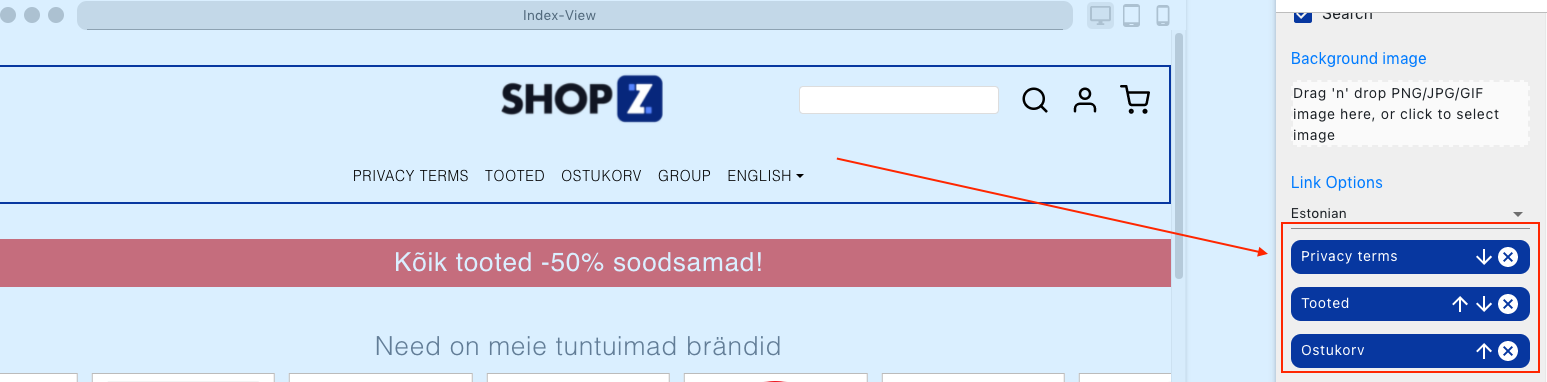
Click on a menu element and translate the link name in the “Option name” field. The link itself doesn’t need to be changed unless it’s not a default Inventory page. Save.
Repeat with all menu items and languages.
WEBSTORE SETTINGS
Here You can find the webshop-related settings.
GENERAL
Customer login required - if this setting is enabled, then the webshop is accessible only for logged in users.
Social media links – allow Facebook, Instagram, Twitter, Snapchat or Vimeo to be linked on Your page. Fill in the fields with Your social media account links.
Fetch images from Erply CDN - in Erply’s new PIM (Product Information Manager). Images can be inserted into two places, Erply CDN and Erply API. If You want to add images to Erply CDN, then this setting must be enabled in order for the pictures to reach the webshop. If it’s unticked, then only images from Erply API will be displayed.
Display EAN instead of SKU for products - enabling this would show EAN code instead of SKU in product view.
Favicon - a small image that is displayed in the browser’s tab. Max. size is 300x300 px.
Logo - Your business’ logo, displayed either in header or footer, or both (PS! This setting is only for displaying the logo in webshop view. If You want to define a logo for printouts, this must be done in Erply.) Logo can also be added in Erply.
Products per page in a category view - how many products would be shown per page in the product group view.
Product cache duration - product info will be updated after the specified amount of time in hours, f.e after every 12 hours.
Choose available languages - choose the languages that You want Your webshop to be presented in for Your customers. Simply tick to enable.
Admin panel language – choose the suitable language for the admin panel
Default webshop language – choose a language that is presented as default for Your customers
Redirect domain – once Your webshop is ready to go live, this is the place where You should add the live URL. Follow the instructions below the section.
TEMPLATE SELECTOR
Choose a preassembled template for Your webshop’s design. You can change all the pre-defined components later in Page Editor if You want.
FONTS SELECTOR
Enable Google fonts that You’d like to use anywhere on Your webshop’s design. Under Page Editor’s global view, there’s an option to add one font universally, but You can also add different fonts for different pages or components.
META CONFIGURATION
General configuration - Here, You can set up the configuration for Google search results.
Page title - the page title that is shown in the browser’s tab and in Google search results as a heading.
Page description - a short description that is shown in Google search results - tell us about Your business.
Page keywords - keywords based on what would Google know, what can be found on Your page. For example, if You sell clothing items, You can write keywords like dresses, skirts, t-shirts, blouses, jackets…
Page-specific configuration allows You to do the same as above, but page-specific, f.e if You want to enter different keywords for different pages.
LEGAL
Here You can add different types of legal pages contents – legal policy, sales terms, delivery terms, privacy policy, GPRD, cookie policy. You can add all texts in all enabled languages. In addition, you can use HTML tags for text formatting.
PAYMENT
Select payment methods - check only those methods you want to display for the customers. PS! You have to arrange contracts with the service providers first (except “invoice”, which doesn’t require a contract of any kind). Inventory platform doesn’t offer services itself.
Different payment methods can be configured by choosing the suitable payment provider from a dropdown first, then the according fields appear. PS! All fields must be filled.
STATUS
Close shop - change the webshop to be inactive or active for customers by using the checkbox. You can also add a message to customers.
ANALYTICS
Google Analytics - this is a free tool that would allow You to see statistics about who, when, and from where came to Your webshop, how much has been purchased, what are the best referrers etc. First, You have to create a Universal Analytics account and then enter the ID (UA-.....) to this field.
Facebook Pixel - this is a free Facebook-related tool that allows You to see the effectiveness of Your campaigns and ads and understand the actions that users take in Your webshop. You can create custom audiences for campaigns based on who visits the webshop etc. First, you have to create an account and then add Facebook Pixel ID to this field.
MAIN PAGE
You can add the name of Your shop in different languages here.
ORDER MANAGEMENT
Allow to check out products which are out of stock - choose whether Your customers could purchase products that have 0 items in stock (preorder).
Email after order to customer - choose whether to send an email to customer after placing an order.
Email after order to supplier - choose whether to send a notification email to the supplier automatically after an order has been placed by the customer.
Allow ordering - choose whether You want Your customers to be able to place orders.
Warehouse id to calculate the shopping cart with - when a warehouse is specified in this setting, price lists attached to this warehouse are used to calculate discounts.
Show only available products in stock - display only those products in webshop that have at least 1 pc in stock.
Discount price list IDs - define all price lists that are used in the webshop.
Price list ID for front page products - define the price list that is used to show specific products on the front page.
Sub price list 1 and 2 - if You want to have 2 different price lists on the front page, then choose those using these fields. Meant for using with specific components only.
Discounted delivery from (eur) - define a cart total, from where the customer should receive a discounted delivery (buy for 50 euros, get free delivery; buy for 50 euros, get delivery for 1 euro).
Invoice document type - select what kind of a document is being created and sent to Erply automatically. It could be invoice, invoice-waybill, order or whatever suits best with Your business logic.
History page type - for very specific use cases, works with one specific product grid view. There is an option to show previous orders/invoices in a B2B shop for a logged-in user. This setting decides, are either purchase or sales documents shown in this view.
Reserve goods - choose whether You want Your customers to be able to reserve products.
Allow to check out products that are out of stock - choose whether Your customers could purchase products that have 0 items in stock (preorder).
Warehouses available for pickup - Here, You can choose which warehouses are available for pickup and also add a prettier name for them that the customer would see. You can also include an address or operating times in the name.
Hide warehouses available for pickup from the customer - if this setting is enabled, then customers can’t choose from dropdown a different warehouse to pick up. This is relevant if You only have 1 warehouse.
Warehouses for ordering (IDs) - allows to choose warehouses that are enabled for ordering. Only products from enabled warehouses are shown and can be ordered.
Delivery methods:
Check only those delivery methods that You want to display for the customers. PS! You have to arrange contracts with the service providers first (except “Pick-up”, which doesn’t require a contract of any kind). Inventory platform doesn’t offer services itself.
Itella and DPD - the service provider, will provide username and password.
Select country - this allows to choose whether You want Your integration to work on live webshop or a test site. For example, if You want to use Itella Smartpost on Your live site and You locate in Estonia, You have to choose Estonia live.
Shipping product - since shipping must be somehow shown on the invoice for the customer, You have to define which product we should use for that in Erply. First, create a new product in Erply (if You want, You can also create a new product group “Delivery” f.e), name it as it would be on the invoice (f.e Itella Smartpost parcel machine) and add a price. Then find the product ID from the URL when You have this newly created product open in Erply, and add that ID in the forementioned setting.
How to find the ID from URL (in this example, the ID is 232, which needs to be added to the setting).
Discounted shipping product - similar to the setting above, You can add another product in Erply for offering discounted shipping from a certain cart total (this setting can be found under Sales settings). Add a new product in Erply and define the discounted price for it, then add the ID under the first-mentioned setting (see the example above).

Pickup settings - if You enabled Pick-up for Your customers, aka they can come and pick the order up at a store or a warehouse. Here You can choose which warehouses are available for pickup and also add a prettier name for them that the customer would see. You can also include an address or operating times in the name.
PURCHASE CONFIRMATION
This email is being sent to the customer after a successful purchase. It includes the order information, contact, payment and delivery details.
There are two options to send this email:
1. from our default email address (not Your company specific). For that, You only need to fill the following fields: email subject, email body, and if You want to receive BCC, then also this field.
2. from Your own email. For that, You need to fill all the fields (HTML and BCC are still optional). Email server: name of the outgoing mail server where Your email provider bases. For example, for Gmail it is smtp.gmail.com, for Hotmail smtp.live.com etc.
SIGNUP CONFIRMATION
This email is being sent to the customer after a new account has been created in the webshop. It includes the possibility to add a coupon code as a thank You, also the account details (without sharing the password for security reasons).
There are two options to send this email:
1. from our default email address (not Your company specific). For that, You only need to fill the following fields: email subject, email body, and if You want to receive BCC, then also this field.
2. from Your own email. For that, You need to fill all the fields (HTML and BCC are still optional). Email server: name of the outgoing mail server where Your email provider bases. For example, for Gmail it is smtp.gmail.com, for Hotmail smtp.live.com etc.
PRODUCT GROUPS
Here You can select (by ticking) product groups that are shown in the webshop. They come from Erply’s product group list, this is a shortcut so that You wouldn’t have to go to Erply for controlling which groups are visible.
SITEMAP
Here You can find Your webshop’s sitemap. A sitemap is generated automatically, and it tells search engines what is included in Your page - it has the hierarchy of the contents. It also helps the search engine decide which pages are the most important.
IMPORT PRODUCTS
Redirects You to Erply, where You can import Your products to.
ADD NEW PRODUCT
Redirects You to Erply, where You can add new products.
ORDERS
Redirects You to Erply, where You can see all Your webshop orders and manage them.
CUSTOMERS
Redirects You to Erply, where You can see all Your webshop customers and manage them.