The POS system allows for either Microservices or browser-based printing. If the printer is compatible with the POS, we suggest using Microservices; otherwise, opt for browser-based printing.
Please, check here the list of compatible printers:
Troubleshooting Guide:
Section I: Checking the Status of Microservices
- Initially, verify the status of Microservices by locating it in the upper right corner of the POS screen. It will display in green if Microservices is running and in red if not.
- If it's green, please proceed to Section II, and if it is red, proceed to Section V.

Section II: Testing the printer through the Control Panel, Printer Properties
- If Microservices is operational (green status), you should test the printer's functionality outside of the POS. Access the Control Panel by clicking the Start/Windows button found bottom left of your computer.
- On the search box, type Control Panel, then click it once it pops up.
- Navigate to Devices and Printers.
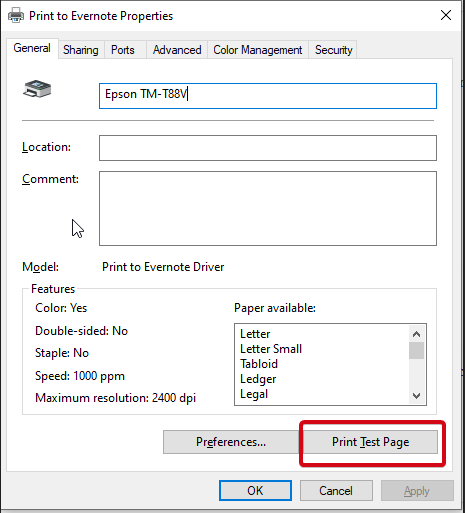
- Find your receipt printer, right-click on it, and click Printer Properties.
- Click "Print Test Page." If it does not print, move on to Section III. If it prints successfully, proceed to Section IV.

Section III: Basic Printer Troubleshooting
- If the test page fails to print, follow these troubleshooting steps: First, ensure the printer is powered on and try rebooting it by unplugging and reconnecting the power cord.
- Attempt the print test again by following Section II; if it still doesn’t print, move on to Section III, step 3. If the test page prints successfully, try printing from the POS system. If it doesn't print from the POS, proceed to Section IV.
- If the test page still won't print, locate your printer in the Devices and Printers section, right-click on it, and select Troubleshoot. The tool will either suggest a solution or resolve the issue automatically.
- Should the problem persist after these steps, uninstall the printer driver and reinstall it, which you can download from the manufacturer's website. If needed, contact the printer manufacturer for further support.
Section IV: Accessing Microservices
- To verify that the printer is included in the printing integration, access the Microservices setup. Start by opening the POS system and clicking on the Settings icon located in the upper right corner (gear icon).
- Scroll down and select POS Onboarding Wizard.
- You will be redirected to a login page—log in using the same credentials as your POS system.
- Once logged in, navigate to the Hardware section on the left panel and click on Integration.
- Go to the POS tab and select the appropriate register.
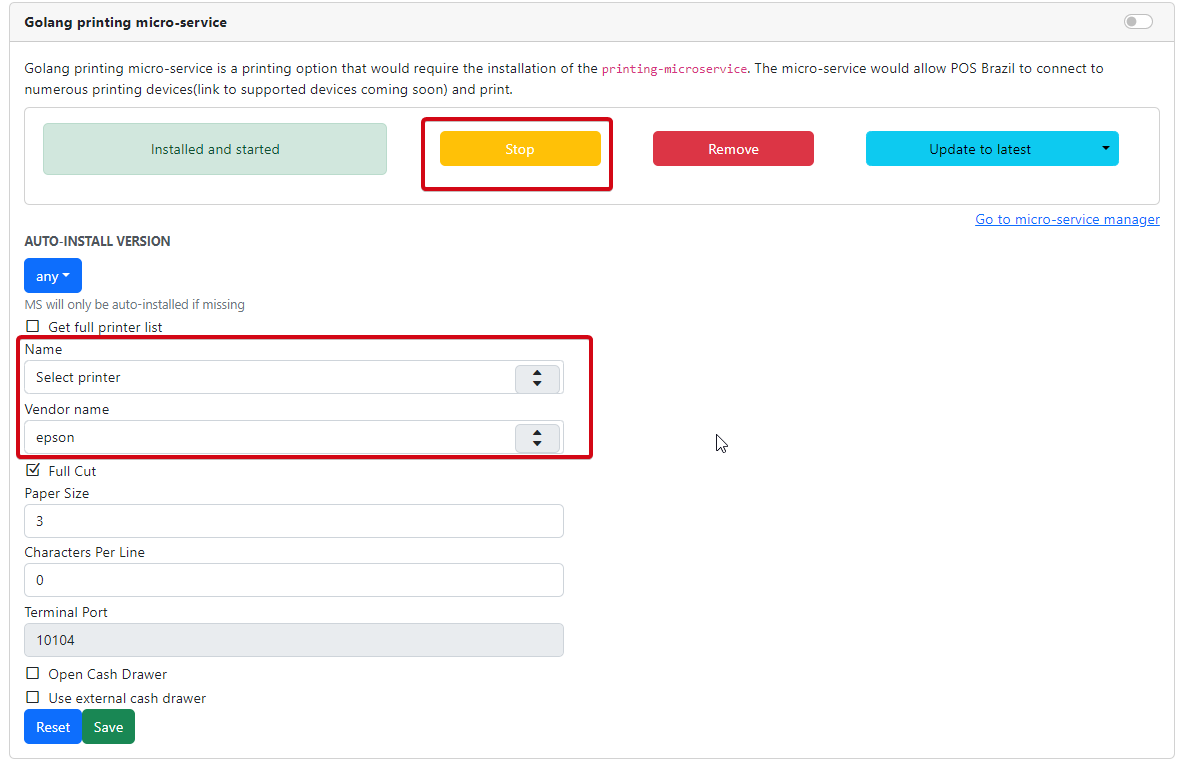
- Choose the Printer and click Continue. Make sure the Golang Printing Microservices is enabled (ensure it is turned on) and click on it.
- Verify that the printer's name is listed under the Name field and that the manufacturer or brand name is displayed under Vendor Name.
- Finally, click Stop and Start to restart the printing integration.

Section V: Restarting Installer2 Service
- If Microservices displays a red status, it indicates that the installer2 service is not running. To resolve this, open Services by clicking the Start/Windows button found at the bottom left corner of the desktop screen.
- Then type "Services" in the search bar and select it from the results.
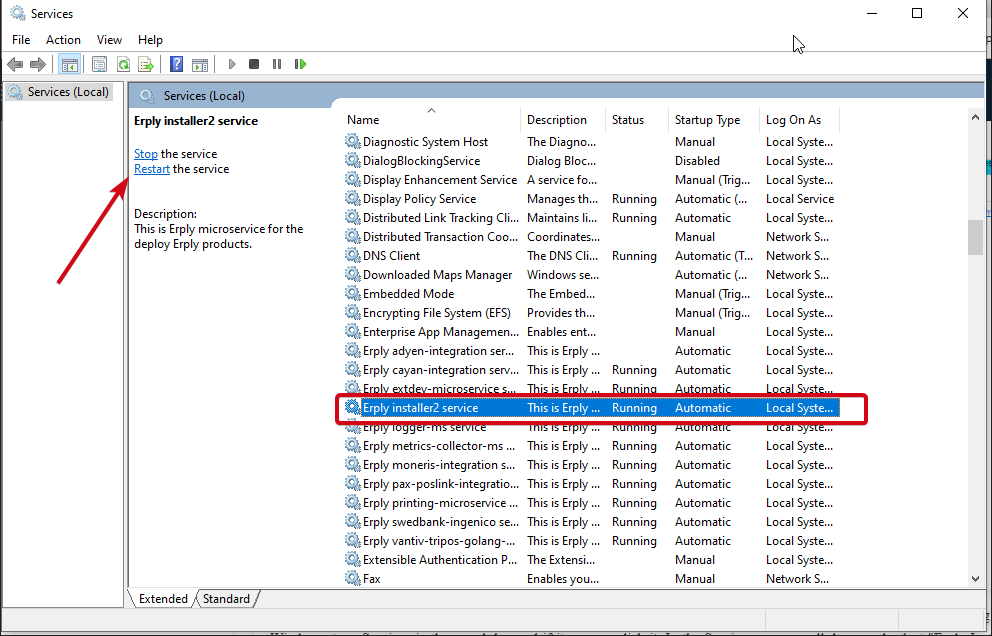
- In the Services window, scroll down and find "Erply Installer2 service,".
- Click on it and choose Restart. After completing this action, open the POS page, if Microservices displays green, please proceed with Section IV. And if Microservices is still in red status, proceed to step 6.

Section VI: Uninstalling and Reinstalling Microservices
- To begin, click the Start/Windows button found at the bottom left corner of the desktop screen.
- Type "Add and Remove Programs". Select the option that appears to bring up the corresponding page.
- Locate Installer2 in the list, click on it, and choose "Uninstall".
- Once it's removed, download Installer2 again for installation. Return to Erply's POS, access Settings, and scroll down to "POS Onboarding Wizard".
- This will direct you to a login page where you should use the same credentials as those used in the POS.
- From the left panel, navigate to Hardware and then Installation.
- You'll find the installer available in either 32-bit or 64-bit versions. If you're unsure about your computer's specifications, click "Download Installer app executable from here" for automatic identification.
- Go to your Download's folder and install the newly downloaded app. After installation, proceed to install the printing integration by following Section IV.
Section VII: Browser Printing
- This procedure is used when the printer is not compatible with Microservices. In the POS system, click on the Settings icon in the upper right corner (gear icon).
- Then, select Printing Configuration.
- Check if the option "Try browser built-in printing if none of the above are available" is selected. If it is, this indicates that the browser is being used for printing. To troubleshoot the printer, refer to Sections II and III.