Overview
With Single Sign-On (SSO), users can log in to Erply by authorizing through the company's existing identity platform, and do not need a separate password for Erply.
Disabling the user's account in the central identity system will also revoke their access to Erply.
Supported identity providers
Erply supports two authentication flows, described in the OpenID Connect standard:
- Implicit flow
- Authorization code flow
There is verified support for Microsoft Entra ID and Google Workspace. Configuring a custom OpenID Connect server is going to be available in Q3 2025.
Supported Erply applications
Single Sign-On works with:
- Erply back office
- Brazil point of sale
Other apps are not supported at this point. To log into other apps, users need to enter their username and password, and turning off password authentication is therefore not possible.
User management
User accounts, user groups and their permissions need to be set up in Erply back office.
All users have to be entered manually to Erply back office (Employees > New Employee and User Account). Their username must match their primary email address in the identity system. Since user creation requires a password (even though it will not be needed), we recommend to set it to a long random value that is not stored anywhere and not disclosed to the user.
Setup guide: OIDC Implicit flow with Microsoft Entra ID
In Microsoft Entra ID, Erply must be registered as an "OpenID Connect" application, under Microsoft Entra ID > Applications.
The administrator must configure two “Redirect URIs” (type: “Web”). One can be added immediately, more URLs can be added later by editing the application's details.
- https://login.erply.com/auth-response (production)
- https://login-sb.erply.com/auth-response (sandbox, used for sandbox accounts)
Under "Authentication" -> "Implicit grant and hybrid flows", please check the box "ID tokens".
To continue the setup in Erply, two parameters are needed:
- Directory ID (Tenant ID) — identifies the company
- Application ID — this gets assigned to Erply when it is registered as an application
In Erply, please open Settings > Configuration Admin from the menu.
Open “Login & Security Settings”.
Fill in the section titled “Single Sign-On”:
- Allow Single Sign-On: yes
- Authority URL:
https://login.microsoftonline.com/ - Directory ID: see above
- Application ID: see above
There are two further security restrictions that can be turned on. However, before enabling these, please complete the Single Sign-On setup and verify that the integration works correctly, and that you are able to log into Erply via SSO. Otherwise you might lock all users out of your account!
- Deselect “Allow Password Login”: with this setting, login attempts from other Erply apps with a username and password will be rejected.
- “Allow Only login.erply.com”: this will make Erply back office and Brazil POS automatically redirect to login.erply.com if user is not logged in.
Login
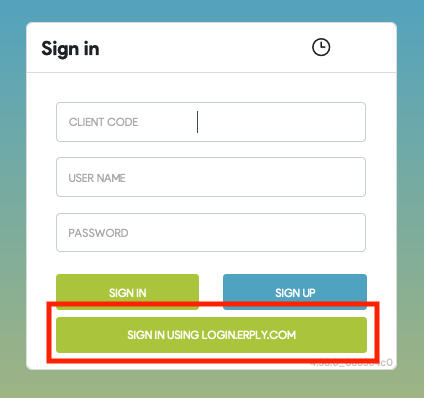
Go to https://go.erply.com/ and click “Use Single Sign-On” at the bottom of the page. Enter your Erply account number.

The login button will redirect you to the identity server for authentication. If you are already logged in, there won't be any additional prompts.
For a login to be successful, your Erply username must be the same as the email of your identity provider's account.
Brazil POS has an additional button “Log in with login.erply.com” on its login screen. Clicking the button will guide through the same login flow. (The initial screen at https://epos.erply.com/ still has the “username” and “password” fields, but turning off “Allow Password Login”, as explained above, will make these non-functional.)
Setup guide: OIDC Authorization code flow with Google Workspace
1. Go to Google Cloud Console
2. Create a Project
- Click the project dropdown at the top.
- Create a new project.
3. Enable the OAuth Consent Screen
- Navigate to "APIs & Services" → "OAuth consent screen".
- Choose:
- User type:
External(for users with Gmail, not part of your org) orInternal(only for Google Workspace org members). - Fill in:
- App name (erply)
- Support email (your email)
- Developer contact email (same as above email)
- Authorised domain (erply.com)
- User type:
- Save.
4. Create OAuth 2.0 Credentials
Go to "Credentials" → "Create Credentials" → "OAuth 2.0 Client IDs"
Select:
Application type: Web application
Add a name
Under Authorized redirect URIs, add the redirect URI your app will use after login based on your account region:
- If your Erply account has a us.erply.com URL:
https://api-auth-us.erply.com/v1/sso/openid-create-session - If your Erply account has a eu.erply.com URL:
https://api-auth-eu.erply.com/v1/sso/openid-create-session - If your Erply account has a au.erply.com URL:
https://api-auth-au.erply.com/v1/sso/openid-create-session - If you have an Erply sandbox account:
https://api-auth-eu10.erply.com/v1/sso/openid-create-session
5. Save Client ID and Secret
Google will generate:
Client IDClient Secret
These will be used in your erply admin configuration (openid_client_id and openid_client_secret).
6. Add configuration to Erply
In Erply, go to Settings > Configuration (new) > Login & Security > Single Sign-On.
Under the heading “Single Sign-On: Authorization Code Flow”, fill in the fields with the values obtained in step 5:
- Application ID
- Client Secret
Login
Use start-sb.erply.com and click “Use Single Sign On”:
