This guide covers the general setup for PAX on Erply Berlin POS using an iPad.
Set up credit card machine
- Click the menu button on the D210 to go to the Main Menu. Enter your password.
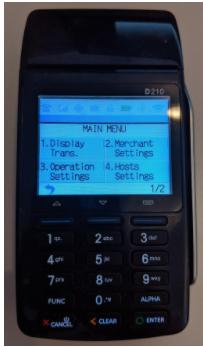
2. Press the down button once, and select Communication using the number pad. Enter your password again.
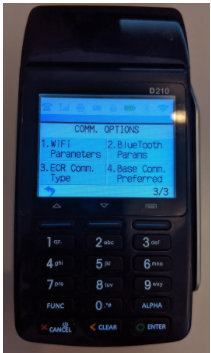
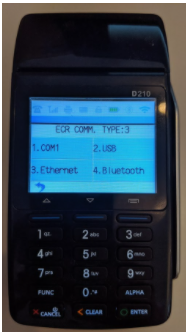
3. Press the down button twice, and select ECR Comm. Type. Choose Ethernet.
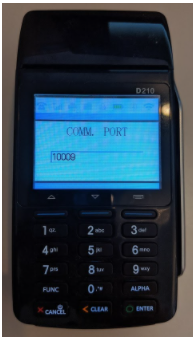
This will bring you to a screen that says COMM. PORT. Write down that COMM Port for later. Hit the green enter button to continue.
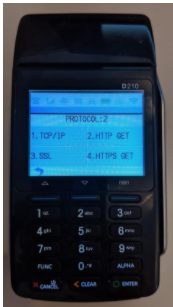
This will bring you to a new menu with the header Protocol: 2. Choose HTTP GET from the menu.
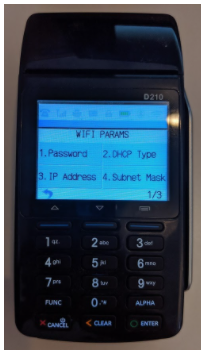
4. Press the down arrow twice, and choose Wifi Parameters using the number pad on Page 3, option 1.
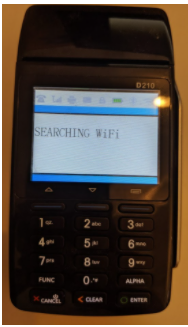
There are two different WiFi Parameter pages. After selecting, the device will search for WiFi networks. Make sure the iPad and PAX D210 are connected to the same network.
Note: If you’re WiFi is already setup, this menu will have buttons that will show network details. If you’d like to choose a new network, press the down arrow three times until you see the option “Switch Router.” Clicking this will begin a search for new WiFi.
The PAX D210 can only view 2.5GHz networks. It cannot see 5Ghz networks.
5. Choose your WiFi Network and input the password if necessary. Make sure the iPad and PAX D210 are connected to the same network.
When inputting a password, use the Alpha key to change letters and numbers after clicking the letters associated key.
6. Once the password is added, hit the red cancel button multiple times until you reach a screen saying Please Wait, WiFi Int.
You will know that the WiFi connection is successful when the WiFi icon is highlighted blue.
If the WiFi connection fails, the device will flash “WiFi Connection Failed” on the screen. It will then try again in 30 seconds. If it’s not successful the second time, verify the password is correct.
7. Once connected, navigate again to the Main Menu.
8. Press the down button once, and select Communication using the number pad.
9. Press the down arrow twice and select WiFi Parameters on Page 3, option 1.
10. Press the down arrow once, and select IP Address.
Write this IP address down. If there are leading zeros, they do not need to be included. For example 192.168.001.015 should be copied down as 192.168.1.15.
On the iPad
- Make sure the “POS Pax” application is closed and swiped away completely.
- Open the iPad Settings application, and scroll all the way down in the left-hand column until you see the POS Pax application. Click it to open.
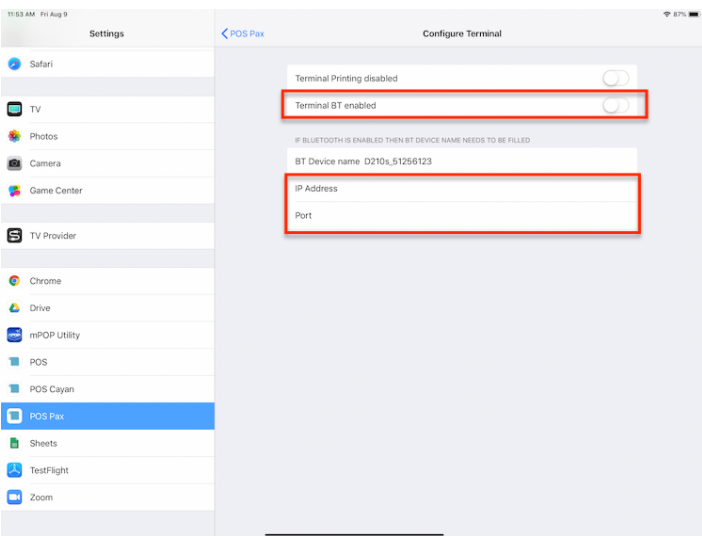
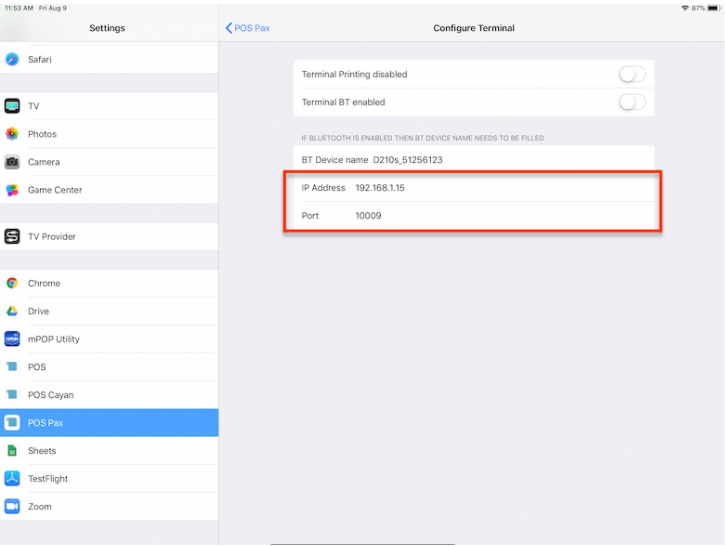
- Click Configure Terminal.

a. In this menu, make sure Terminal BT Enabled is toggled off.
b. In the IP Address field, type the IP address you wrote down from step 10a.
c. In the Port field, type the port number from step 3a.
4. Launch the POS Pax application and process a test sale. Verify the setup is completed correctly by attempting to take payment and seeing the “Please Swipe” prompt on the PAX D210 device.