Overview
Go to the “Integrations” section in Ground Control to manage microservices.
("Microservices" are like device drivers: Windows, Linux or Mac apps, installed locally on the register. The microservices continuously run on the background and let Erply POS talk to a hardware device: a printer, a payment terminal (EFT), or a fiscal device. There is a separate microservice for each payment provider.
Microservices can provide other features, too: keep a local database of products, or let the cashiers log on when there is no Internet connection.)
Prerequisites
1. metrics-collector-ms
Seeing the statuses and version numbers in the list view requires microservice "metrics-collector-ms" to be installed and running on every register.
The microservice periodically queries running services and uploads that information to Point of Sale API; the data uploaded from each register is shown in Ground Control.
To install metrics-collector, go to the register (or log on remotely) and open the web app “POS Onboarding wizard” in the browser:
https://posow.erply.com/hardware/installer/msconfig > "Add new micro-service" > "metrics-collector-ms"
On every login, Brazil POS & Self-checkout POS are supposed to send account number and register ID to metrics-collector—so that uploaded information would be associated with the correct account number and the correct register.
- Self-checkout POS is integrated with metrics-collector by default, and updates the information once a minute.
- In Berlin POS, the integration has to be enabled manually. Click the “Settings" icon on the top bar and open “Plugins”. Search for the plugin named “metrics-collector beta”, and tick the box in front of it to enable the integration. The upload interval is configurable, the minimum is 10 minutes. After enabling the plugin, log out of POS and log in again.

2. Installer 2.3.1
Interacting with a register requires a live connection between the register and Erply's servers. This connection is created by the installer, and requires installer version 2.3.1 or newer.
If you open a microservice's configuration page and the status field reports “Not connected”, then the installer has not established a connection; the register might be running an older installer version, or installer might not be set up properly.
To establish a connection to a server, installer needs to know the account number.
Brazil POS, since version 4.51.19 (13 Dec 2023), passes this information to the installer automatically on every login, and the live connection starts working after you log into Brazil POS.
Self-checkout POS will get a similar integration soon. Meanwhile, as an alternative, it is possible to edit the installer's config.json file on the register and enter the account number manually:
  ...,
  "clientCode": "12345"
}
The configuration file is located at:
- Windows:
C:\Program Files\Erply\Installer2\config.json - Mac:
/Library/Erply/installer2/config.json
Register list
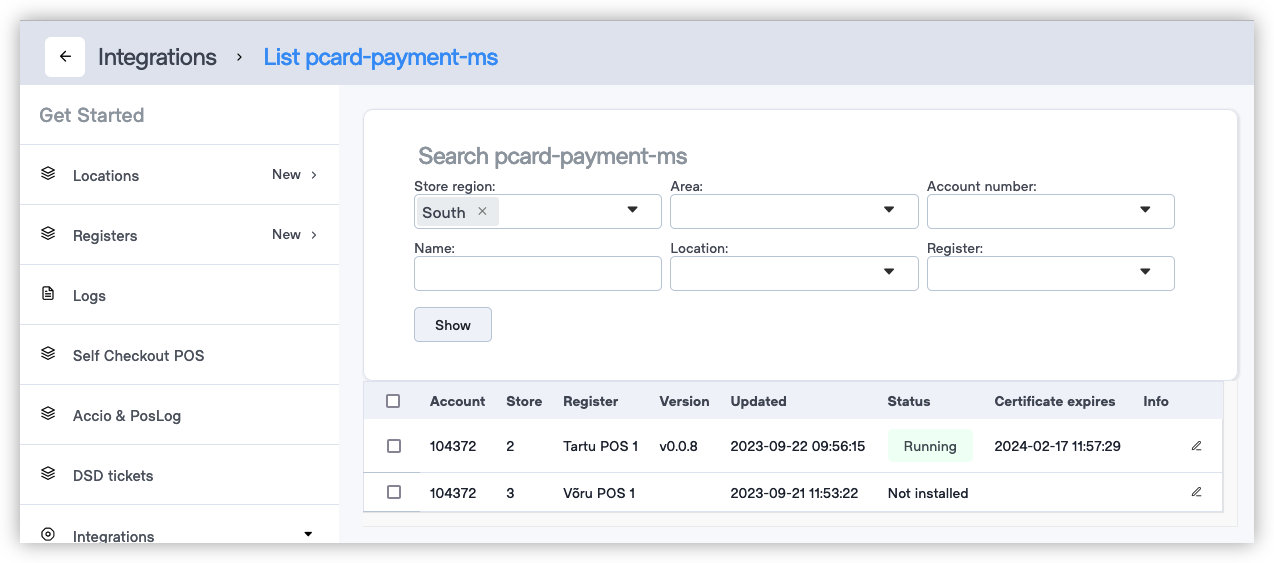
To see the current status and installed version of microservices, please go to Apps > Ground Control > Integrations. Integrations are listed on the sidebar; pick the one you want to see.
This page lists all the registers where metrics-collector has been installed and regularly reports to the server. Registers without metrics-collector do not show up.
If a service is installed in that register, its version number and status (running/stopped) is shown. If an error occurred while starting up the service, the message will appear in the "Info" column.
If a service is not installed, the status field displays "Not installed".
Managing a service
Pick a microservice and a register and click the "Edit" icon. On the following page, it is possible to install/remove, update, and start/stop the service:
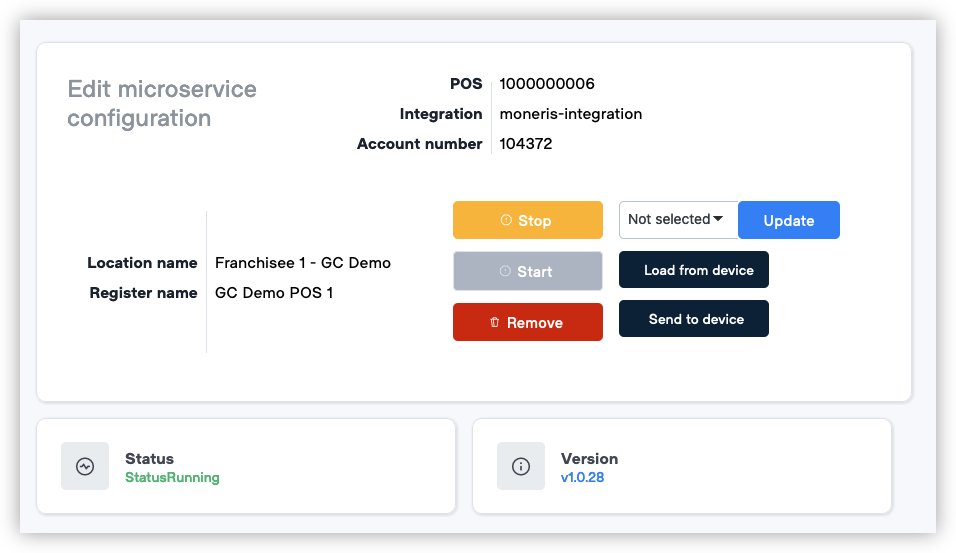
To install or upgrade, please select a version from the dropdown. After an installation or an upgrade, you might need to refresh the page.
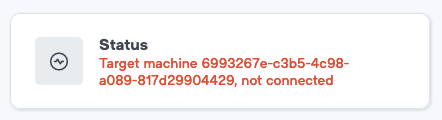
Attempting to send a command to a register that does not have a live connection to Erply's servers will produce an error.
If the live connection was working previously, but has been dropped for some reason (error messages: "Target machine not connected", "Target machine busy"), please try again in 5 minutes. The installer app verifies the connection status every 5 minutes and reconnects if needed.
Note that on the screenshot above, the status and version are live information, queried right from the register. If a register is not reachable, nothing is shown. The register list view, on the other hand, shows cached data that gets updated periodically. If a register has not been reporting back to the central cerver, the list view keeps showing the last available information; the "Updated" column helps to identify stale records.
Microservice configuration
Below the installation controls and the current status, you will find the fields for configuring the microservice.
If the fields all appear empty, click the “Load from device” button at the top, to fetch the initial settings from the machine and store them on the server. This only needs to be done once; from that point on, the server has a copy of the settings.
Most of the fields do generally not need to be edited; the default values are fine. As a rule of thumb, you only need to edit credentials: account numbers, merchant IDs, integration tokens and the like.
When you have completed the configuration changes, please do two teps:
- Click “Save” to save the changes to the server;
- Click “Send to device” at the top, to send the updated configuration to the register.