Nets Connect@Cloud payment terminal installing to ERPLY Brazil POS
Send your request to NETS to activate "Connect @ Erply cloud" in use. Requests can be sent to address support-fi@nets.eu.
Connection settings between ERPLY POS and Payment terminal
When user details have arrived to you, confirm that payment terminal has following settings:
Firstly swipe the Merchant card through from the terminal side
Then press numbers on the keyboard: 6 + 1 + 3


Text on the terminal screen must say now: Cashier, Yes (If the text on the terminal says “No”: press the green button. Select with the arrow buttons "up" or “down” until text “Yes” is on the screen. Save with the green button).
Then press on the “arrow down” button.

Komm Type = IP Ethernet
Then press on the “arrow down” button.

ECR/TLS = Yes
Then press on the “arrow down” button.
ECR IP = 212.226.157.243
Note: To change the IP address inside of the terminal. Press the green button. Then correct the number. Press the green button every time to move to edit the next number column. To save changes press the green button once more.
Then press on the “arrow down” button.
ECR Port = 6001
Note: When you have changed the settings, restart the terminal by pushing the red STOP button 2 times (if no changes made, then skip this step).

To restart the terminal
Press the buttons “ . , ' ” and the yellow button down at the same time for 10 seconds.


Configure Nets FI Cloud at the Brazil POS
Navigate to the POS settings.

Select Payment Configuration.

Select Setup Payment gateways.

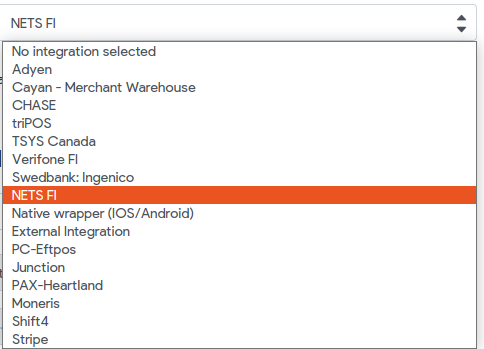
Find the field “SELECT CURRENT INTEGRATION”.

Select NETS FI from the dropdown list.
Mark the box in front of the following functions if needed: ("Allow fallback to external integration" will allow the terminal to make external payments when the connection will get lost between the terminal and NETS FI payment. Function “Sync batch to day openings” will sync the payment terminal payments with the day openings).

Into the field “ENVIRONMENT” select production.

Into the field “USERNAME" enter your username from Nets Cloud.

Into the field “PASSWORD" enter your password from Nets Cloud.

Press Login.

Once you are logged in successfully you will see the green notification “Logged in”.

Press Edit

Into the field “TERMINAL” select the terminal from the dropdown list (You can check the terminal ID number on the terminal by pressing the “down arrow” button >- Shortcut menu -> terminal info).

From the PRINT MERCHANT COPY and PRINT CUSTOMER COPY select one of two options “ask” or "always".
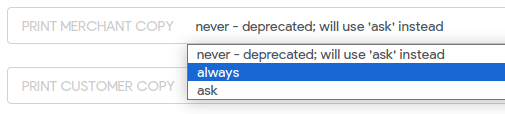
If you select ALWAYS it means that the merchant or customer payment receipts from Nets will be printed always automatically after each sale.
If you select ASK option then the POS will ask you each after the successful sale to print or not print the merchant or customer payment receipt from Nets.
Note: The NEVER option is deprecated from Brazil POS version 4.51.37.
Press Save.

After the credentials have been added and saved, the first thing to do at the payment terminal is to make a day closing:
- Swipe the Merchant card through from the terminal side
- Press the “yellow button”
- Navigate to point 6.
Test the terminal connection
Under the topic "Tests:" you can test the connection with the terminal.
Firstly press the button “Test connection”.
Announcement button on the right side will tell you the results of the connection. If the connection was successful you will see the text “Success”.

Then click the button “Pay 1,00$”. When the amount “1€” appears the payment terminal screen, then the connection is available and the function works correctly.

Connection problems
Download new parameters and programs to terminal
To download new parameters and programs to the terminal follow the instructions below.
Download dataset (parameter download):
- Swipe the Merchant card through from the terminal side
- Press the buttons: 1 + 1

Download software (software download takes time, can take for hours):
- Swipe the Merchant card through from the terminal side
- Press the buttons: 8 + 1
Close batch (Close day):
- Swipe the Merchant card through from the terminal side
- Press the buttons: “yellow button” + 6

Also you can check that the connection settings between the payment terminal and Nets are as follows:
- Swipe the Merchant card through from the terminal side
- Press the buttons 6 + 1 + 2
- Host IP:n should be "91.102.24.142"
- Host Port should be “9670”
4G/GPRS connection settings of the payment terminal
Move3500 payment terminal Viking 1.01.0 software + sim card.
Send to Nets request to update Viking software technical-solution-support@nexigroup.com
Update software: Merchant card + 8 + 1 (! Update takes some time so recommended to do this outside of business hours if possible)
- Swipe the Merchant card through from the terminal side
- Press buttons 6 + 1 + 2
- Komm Type = GPRS
- Host IP:n should be“91.102.24.142”
- Host Port should be “9670”
Fallback to an external integration if NETS FI payment is failed
Please refer to this article in order to configure an External integration as fallback.
Frequently Asked Questions
My payment merchant receipt is printed from the terminal by default. How can I disable printing of merchant receipts?
- Navigate to the Brazil POS epos.erply.com
- Go to the Settings -> Payment Configuration -> Select Nets FI integration
- From the “Print merchan copy” select “ask” option
- Click Save for the updates (if it was already selected, please skip this step)
- Now take your payment terminal and swipe with your merchant cart in order to access terminal settings
- Use the following buttons combination: 6+1+1
- Find the setting “Always copy” and select option “no”
- Click on the green button on the terminal
- Terminal will start rebooting to apply changes.
Now POS will always ask you about merchant receipt printing where you will be able to agree with printing or cancel.