A donation is any kind of financial or humanitarian aid for those who need it. It is gaining popularity every day. Most companies try to take part in this as much as possible and help, depending on their possibilities.
Customer display application gives this possibility to have a donation functionality.
How to start using it?
Create a product in Back Office which will be used as donation in POS
- Log in to the Back Office, enter your credentials
- Click on the PIM, then “Add a Product”
- Enter all required product information
Note: donation product must be tax free, non-refundable, non-discountable.
4. Tick the following checkboxes:
 |
 |
 |
5. Save the product
Add a product as a donation in POS
- Log in to the Brazil POS , enter your credentials
- Go the Settings - Plugins
- Find the “Customer display” plugin in the list of plugins
- Click “configure plugin” (yellow button)
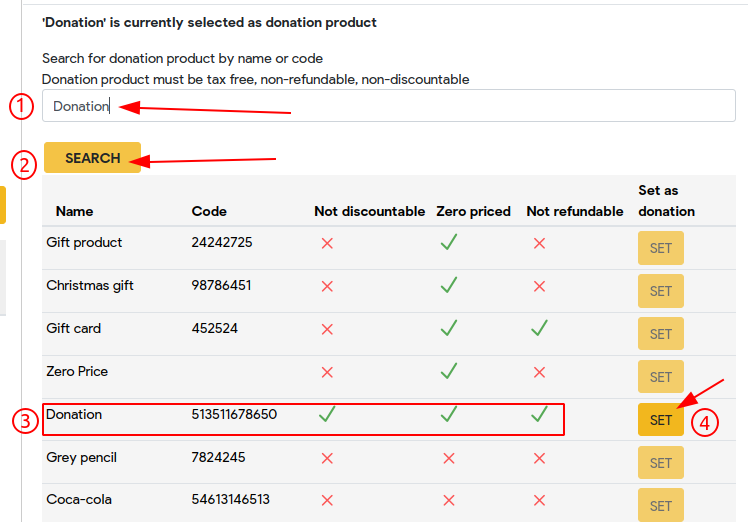
- Scroll down to the “Search for donation product by name or code”
- Enter the product name which will go as donation (was created previously)
- Click “Search” button
- The product will appear in the spreadsheet with correct data
- Click on the “Set” button next to the product
What will the donation process look like?
- Make sure that the Customer display and POS display are opened and ready to use
- On the POS display in the menu bar click on the “green display” button
- Then click “gift box” button - “send donation request to customer display”
- Go to the Customer display and and select the amount you wish to donate: 5, 10, 15, 25 or click on the “pen” button that to apply another amount
- Click green checkmark that to confirm your donation amount, or “X” button if you want to go back and make changes
- The amount was confirmed in Customer display
- Go to POS and click on the green button “Accept” which had been appeared on the POS menu bar
- Afterwards the product was added to the shopping cart in POS and the product edit modal is opened - here you are able to change the donation amount and product quantity if it is needed ( discount and discount price fields are unavailable for editing)
- Click Save
- Click the Pay button on the POS screen and finalize the donation process with applying any payment method.
Donation performed successfully!