Moneris account in Moneris platform
Before setting up the Moneris microservice in the Wizard make sure that you have created a Moneris account and Moneris payment device. If not, please create one in Moneris portal.
Install the Installer App
Here you can find the Installer App installation guide. If you already have it installed, please skip this step.
Setting up Moneris microservice in the Wizard
In order to establish a connection between the POS and Moneris terminal we need to install the microservice and configure the service to use the specific terminal.
Visit Erply Wizard to install the microservice:
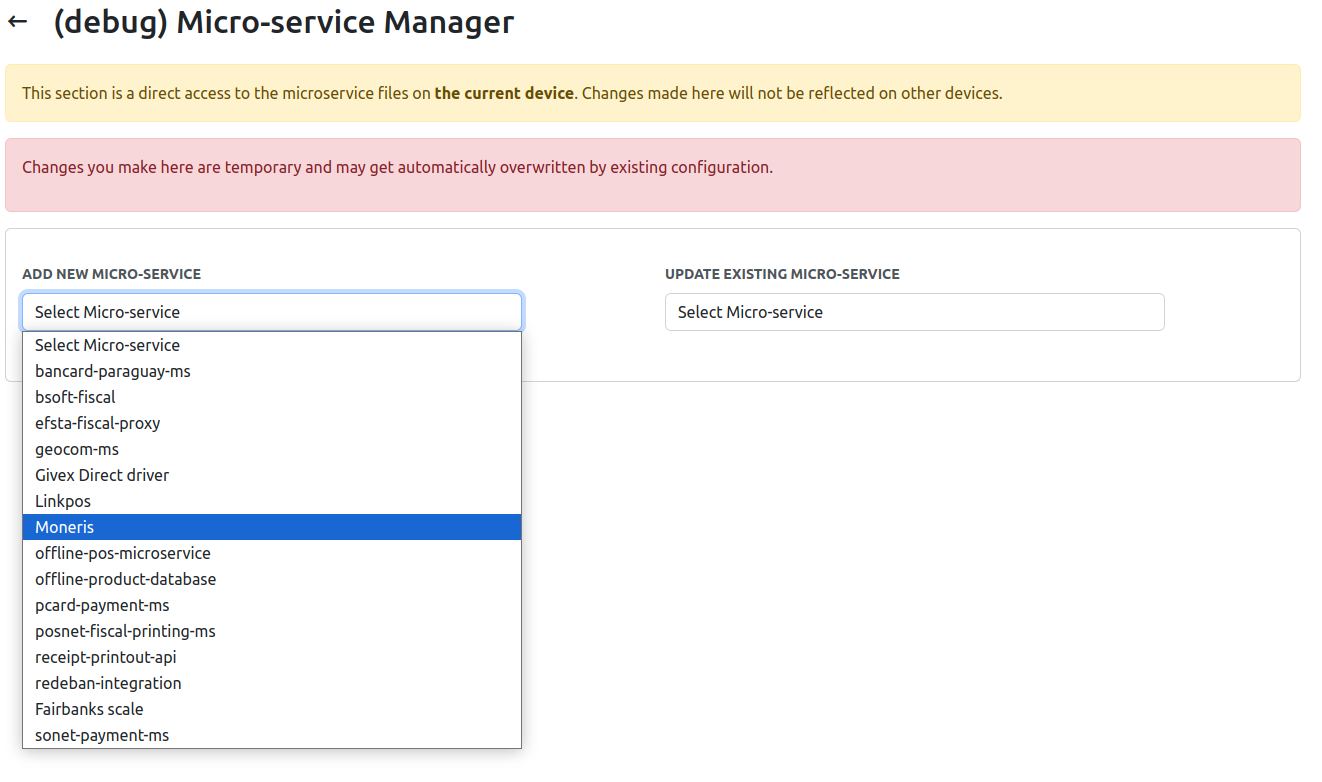
Navigate to the Hardware -> Installer App -> Microservice Manager.
Select “Moneris" from the dropdown.
Click Continue.
Click Install Latest (blue button).
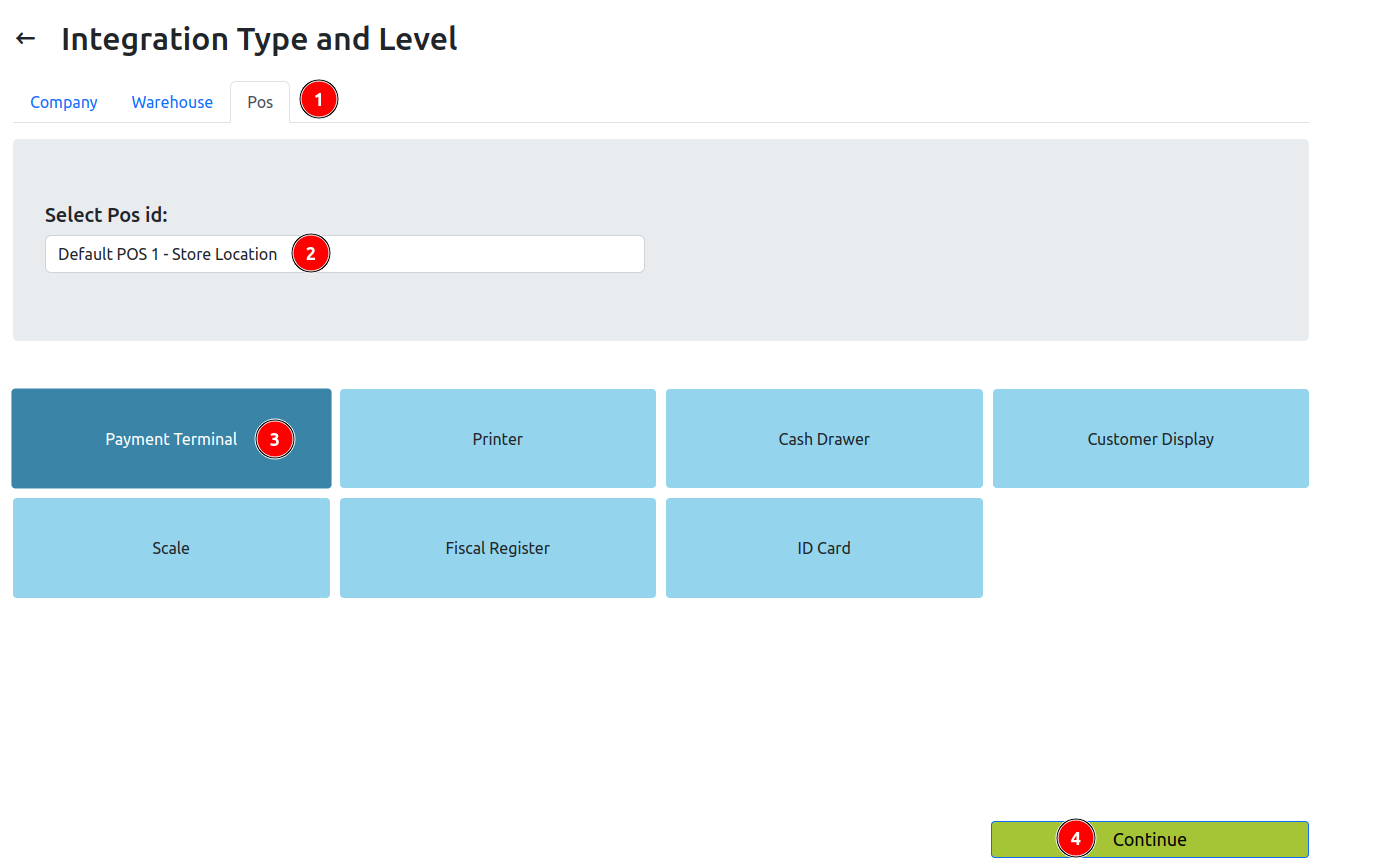
Once the microservice is installed, go to Hardware -> Integrations.
Select POS level and pick the POS you want to configure the terminal for.
Click on the Payment Terminal.
Click Continue.
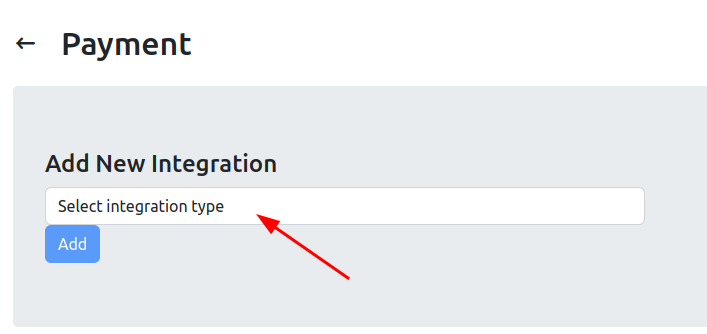
Select Moneris as integration type, click Add
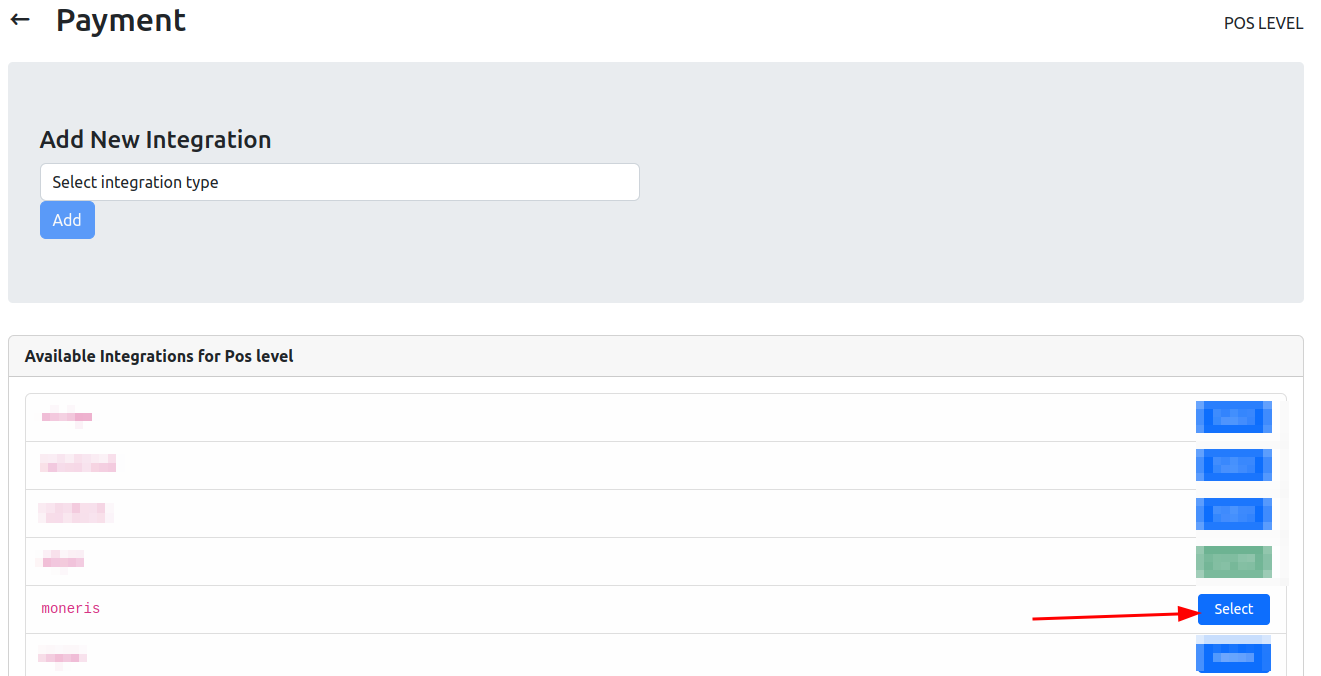
PS: if there is no “Moneris” in the list please check it below in the “Available Integrations for POS level” and click ‘select’ button
Once the integration was selected the Wizard will direct the user to the microservice configuration:
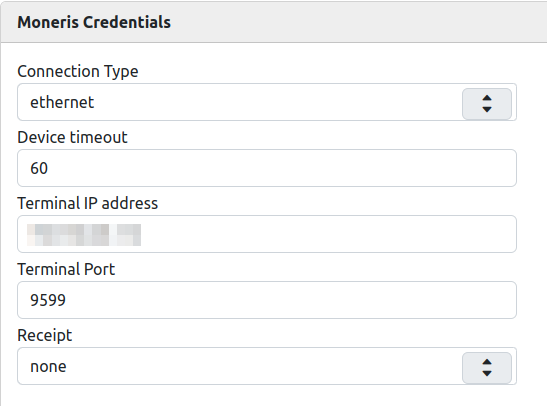
The only field that you need to check and edit is “Terminal IP address”.
Device IP can be found from the terminal. (To see device information (IP address) on the terminal press the yellow “<“ button and “4” , or press the number 1,5 and 9 at the same time - this should ask you for a passcode. Possible passcode combinations are “9416557”, “166832” and “200331”).
To get the IP address for the P400 Plus, press the yellow button and then press the number 4.
In the “Receipt” field you can configure which copies of payment receipts should be printed:
- None
- Merchant
- Cardholder
- Merchant and cardholder
Once configured click Save (green button).
Setting up Moneris microservice in the POS
Navigate to the Brazil POS https://epos.erply.com/latest/ and login with your Erply credentials.
Then go the POS Settings -> Payment Configuration -> Setup Payment gateways
Select current integration: Moneris
Check the terminal IP address, it should be the same as in Wizard. Configure other fields if needed.
Enter the terminal ID and the merchant ID provided by Moneris. Make sure that you are at the terminal's homepage then click “Activate Terminal”
Click on the green “Test connection” button.
There will be a “Connection OK” message if connection with the terminal has been established.
If there will be a message “Unable to connect”, please check the following:
- the Ethernet connection on the terminal
- Terminal IP address
- POS register(device) is in the same network as Moneris payment terminal
- Recheck in the Wizard that Installer app and Moneris payment integration are running
Click Save.
You can also configure the Manual Keyed Entry by following this article : https://wiki.erply.com/article/2313-moneris-manual-entry-mode-in-brazil-pos?searchRedirect=true
Pay with Moneris
Add products into the shopping cart.
Hit Pay.
Select card payment - the payment row is added with Moneris integration:

Click ‘green checkmark’ to finalize the payment.
Cancel the payment
Removing the payment card during the payment processing
In this case the POS will show the following message in payment window:
“The EMV card was removed from the insertion reader prior to the completion of the transaction”
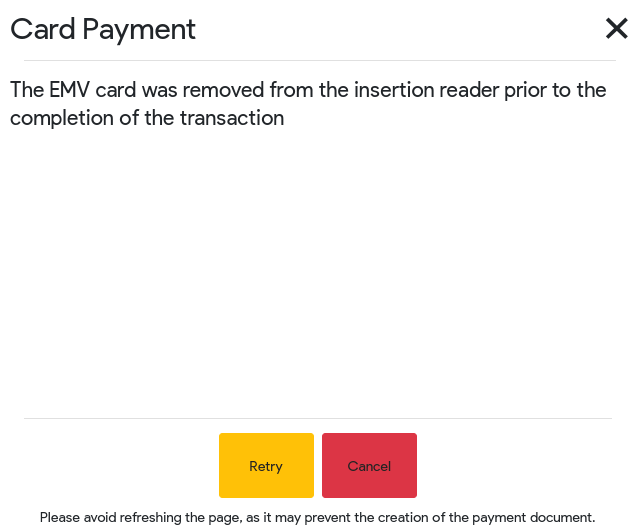
Here you can decide:
- “Retry” - send another payment attempt to the terminal
- “Cancel” - return to the payment screen
Cancelling the payment
The payment can be cancelled only on the terminal side by pressing the red button.
Voiding payments
In case there were multiple card payments applied, one of them was successful, the second one has failed for some reason or the client would like to cancel the payment at all, there is a possibility to void those payments that have already been approved.
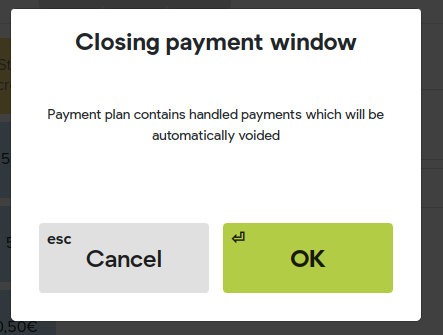
In order to void payments please click on the red cross button or close the payment window.

Afterwards the POS will give you a “Closing payment window” popup with message “Payment plan contains handled payments which will be automatically voided”. There you can choose:
- “Cancel” - return to the payment screen
- “OK” - cancel the payment and return funds back to the client card.
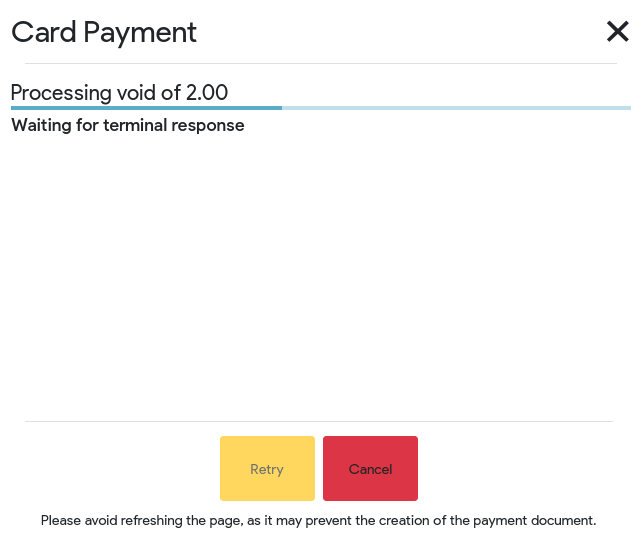
In case you will press “OK” button the POS will start voiding approved payments and you will see the following screen:
Return with Moneris
Referenced return (return based on receipt)
In order to start the return for sale that was paid by card with Moneris integration, you need to find the sale in the POS using the receipt number. It can be found under the red “Return” button or in Recent Sales.
Once receipt has found select products, apply reason codes if it is required and click Save.
Hit Pay.
In the payment window you will see the initial card payment on the right side and automatically applied return payment on the left side:
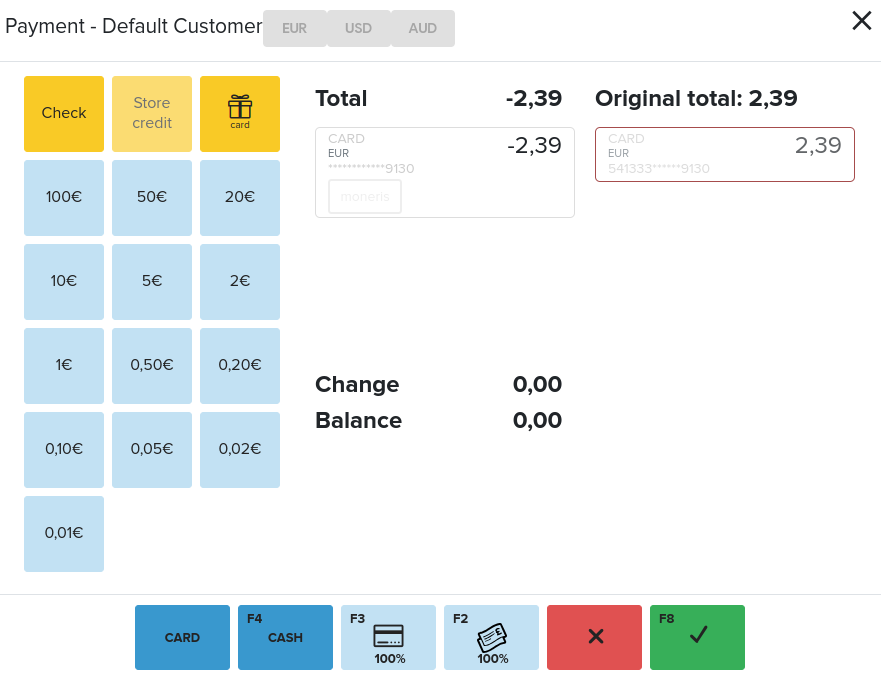
In case you would like to refund money to the same card, please click on the ‘green checkmark’.
In case you would like to change the return payment method please click on the automatically applied return payment method

and then green OK button on the left side numpad:
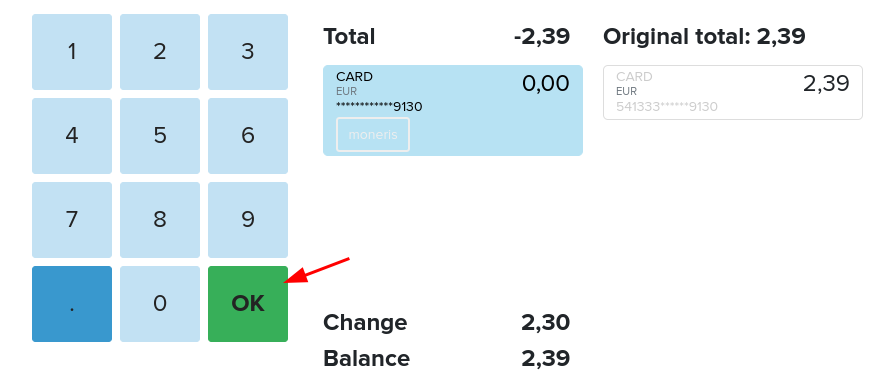
Afterwards apply another return payment method and finalize the return.
Note: If the payment method is not automatically selected and you would like to make a refund to the client card, that document was paid with, click on the original payment method on the right side.
Unreferenced return (return without the receipt)
Add needed products to the POS shopping cart.
Set a negative quantity for products.
Select the return reason if it is required.
Hit Pay.
Select the card payment method.

Finalize the payment by clicking on the ‘green checkmark’.
You will see the “refunding purchase” process in the POS payment window.
Once the amount appears on the terminal screen the client should insert his/her payment card into the terminal.
Close day with Moneris
The “Sync batch to day openings” in the Payment configuration -> Setup payment gateways -> Adyen:
- if enabled - while closing the day in the POS, day is also closed on the terminal and all the payments are sent to the bank automatically;
- if the setting is disabled, you need to close the day in the POS and terminal separately.