This section describes how log files from registers become centrally available in Ground Control, and what applications must be installed for the feature to work.
Prerequisites
1. Offline-product-database upgrade
To collect logs from offline product database, the offline-product-database service must be updated to v2.14.0 or newer.
Older versions save the log files with a .txt extension, but logger-ms will only collect files ending in .log. This issue is specific to the offline-product-database; other integrations work with the logger-ms without needing any changes.
2. Microservice configuration
To collect logs from installed microservices, check that the services have been configured to write logs to a file. Sometimes there is a "logTarget" property in the service's configuration file; if it is there, please ensure that it is set to "FILE":
"logTarget": "FILE"For testing it may also be useful to increase logging level:
"logLevel": "DEBUG"Log file handling
Once started, the logger-ms service will automatically upload log files once a day. The service will zip the whole "logs" directory in every microservice's installation folder, and will upload the archive to the log server.
The name of the file is assembled as follows: <client-code>_<device-id>_<warehouse-id>_<pos-id>_<service-name>_<date>.zip
For example: 500500_c2c921c4-a5c5-1b72-1a1d-1c697aae5295_2_6_cayan-integration_2023-07-11.zip
The archive includes all the logs that have accumulated in the folder so far. Future updates to logger-ms will delete the logs that have already been successfully uploaded, to reduce duplication.
Retrieving logs on-demand is possible, but currently requires access to the register. Opening the following URL on the register machine will trigger an upload (logger-ms listens to port 10900 on the local machine)
https://localhost.erply.com:10900/scheduler?action=once
Master account users have access to the logs from all Erply accounts in that country. Users on store accounts have access to logs from their own account only.
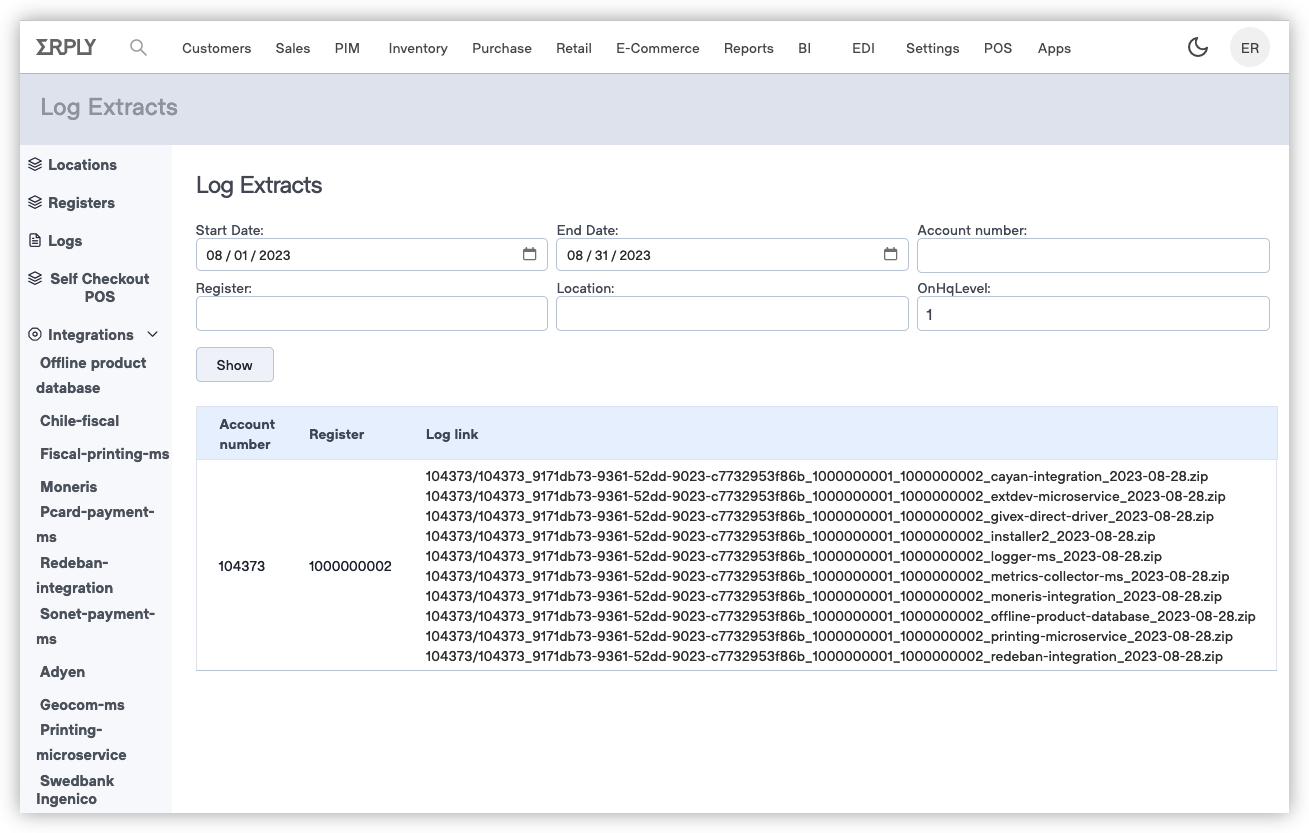
The page lists all accounts and registers for which logs are available. Registers with no logs are not listed.
Clicking on a file name in the list will download it.
It is possible to filter logs by a date range. The "Register" and "Location" search fields will soon be updated to multi-select dropdowns. Right now the fields expect a register ID and a warehouse ID.
The list view currently displays register ID; this will be changed to register name.
Logger-ms configuration
During initial testing it may be necessary to check or modify the configuration of logger-ms. Logger-ms has the following configuration options:
    SaveLogPeriodMinutes: 0,
    StartUploadAt: "00:00",
    StartOnBoot: true,
    SendLogOnStartup: true,
    RandomlyWithinHour: true,
KeepFilesInBucket: false- SaveLogPeriodMinutes - How often the logs are uploaded (0 means once a day)
- StartUploadAt - at what time will the upload happen if logs are uploaded once a day (string, default value is “00:00”, 24 hour format).
- StartOnBoot - start scheduler on boot (boolean, default value is false).
- RandomlyWithinHour - send log files at the hour of StartUploadAt, but the minutes are set randomly (boolean, default value is false).
- SendLogOnStartup - should logs also be uploaded when the service starts. This might be useful if the regular daily upload time might otherwise be missed if the computer is off.
- KeepFilesInBucket - By default, files older than 100 days are deleted from the server. Setting this flag disables the deletion and retains older files as well.
Configuration can be changed locally either with POS Onboarding Wizard ("Installer app" > "Micro-service manager" > "Update existing micro-service" > "logger-ms" ), or by invoking a URL:
https://localhost.erply.com:10900/scheduler?action=set&StartUploadAt=15:02&SaveLogPeriodMinutes=1440&StartOnBoot=true&RandomlyWithinHour=false&SendLogOnStartup=true
Testing steps
- Install Installer.
- Install the logger-ms microservice.
- Install other microservices that are known to produce log files (for example: adyen-integration).
- Check the configuration of installed microservices, to make sure that they are writing log entries into a file (if such configuration option exists)
- After changing the configuration of a service, restart it.
- Log into self-checkout POS (to tell to logger-ms which account number and register to use)
- Tip: to test that Ground Control indeed collects logs from all accounts in a country, log into a store account. Later, log into master account back office to view the log files.
- POS must make a successful (status code 200) call to https://localhost.erply.com:10900/registerDevice. The call can be observed in the browser console, "Network" tab.
- Perform a test transaction or something else — to make a microservice produce log entry/entries.
- Use the manual upload command to upload logs right away (or wait until the scheduled upload time).