The following instruction enables you to set up and update existing printing via the Swedbank Ingenico terminal.
1. Install the printing micro-service
Log in to Brazil POS (https://epos.erply.com/)
Select Settings (cog icon in the POS menu bar)
Find the topic Links
Select POS Onboarding Wizard - this will open Erply Wizard: https://posow.erply.com/
Login using your Erply account (clientcode, username, password).
In the Wizard press on Hardware -> Installer App -> (debug) Micro-service Manager.
In case you still do not have the printing micro-service installed, navigate to ADD NEW MICRO-SERVICE and select printing-microservice from the dropdown menu (NOTE: In case you can not find it from the list under “Add new micro service” please select it from the list on the right side UPDATE EXISTING MICRO-SERVICE )
Once printing micro-service is slected click Continue
You will see the view of the printing-microservice page
Make sure that the microservice status is Installed and started:
If not, then press Start
2.Set up the terminal as receipt printer
In the Wizard navigate to Hardware -> Integrations
Select the category POS
Select POS location from the dropdown menu Select Pos id
Click Printer
Press Continue
Toggle the Golang printing micro-service on the right side(must turn to blue) to enable the integrated printing:

Then click on the Golang printing micro-service row.
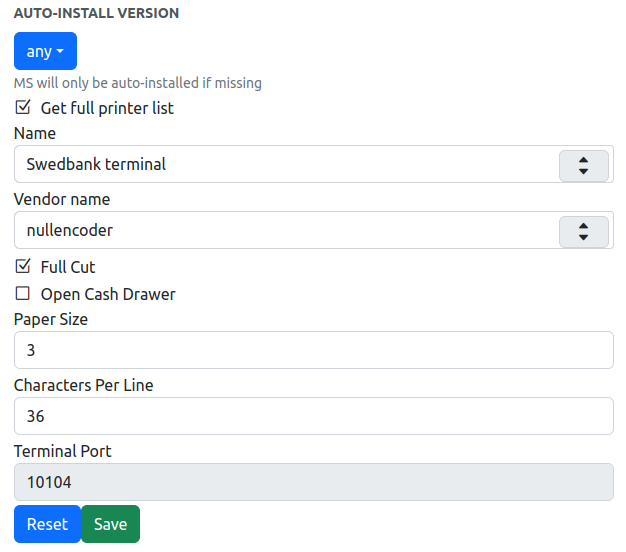
You will see the printer configuration view:
- Mark the box in front of the field Get full printer list
- Name: select Swedbank terminal from the dropdown menu (if you do not see the Swedbank terminal in the list, try to refresh the Wizard page and try again)
- Vendor name: nullecoder
- Check the Full Cut check box
- If you would like to open the cash drawer while printing the receipt then check the Open Cash Drawer
- Paper size: 3
- Characters Per Line: 36
- Terminal port is always 10104(is not allowed to change it)

Press Save (small ggreen button)
On the top press yellow Stop. Then press Start. Those actions will restart the printing microservice.
3.Test the receipt printing
Go back to the POS (https://epos.erply.com)
Refresh the POS page (refresh button next to the URL).
In the POS select Recent Sales.
Choose any sale and click on the “printer and paper” button to print the receipt.
If it is still not working please contact Erply Support team support@erply.com