This guide covers how to set up Worldpay TriPOS payments with Erply POS. The following steps will need to be repeated for each TriPOS device on each related point of sale terminal.
Prerequisites
Worldpay merchant account
The following credentials are provided by Worldpay:
- Acceptor ID
- Account ID
- Account Token
EPSI
EPSI (ERPLY Point of Sale Integration) must be installed and running.
The TriPOS system will only work with EPSI 2.0 or higher.
Install Verifone USB drivers
- Connect the payment device to the POS computer.
- Contact Erply Customer Support to obtain the Verifone USB drivers.
- Email us: support@erply.com
- Call us: (917) 210-1251
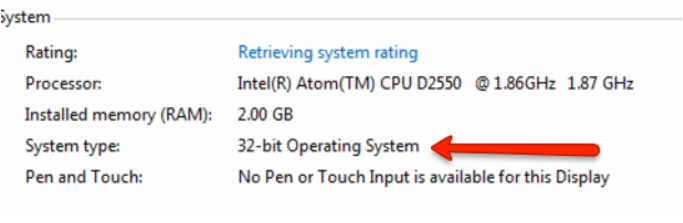
3. Confirm whether your Windows runs on a 32 bit or 64 bit architecture.
To find this, view the System window in your Windows control panel. The information will be listed under the System header, as System Type.”
4. Run the appropriate driver from the folder representing your windows architecture.
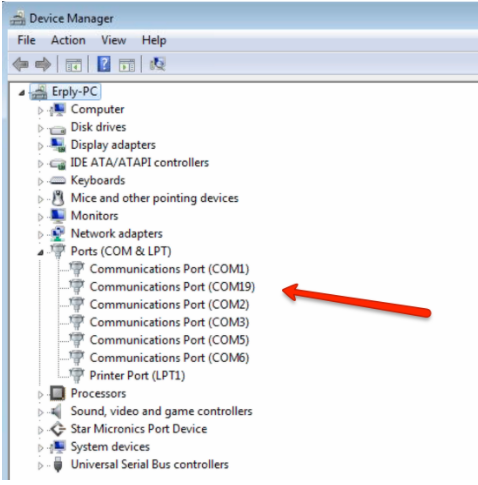
5. Follow the on-screen instructions. Be sure to note the COM port being assigned in this installation.
We recommend assigning a COM port that is not in use. To determine this, check ports in use in the device manager, which is also accessible from the Windows control panel.
Install TriPOS service
- Contact Erply Customer Support to obtain the Vantiv TriPOS service installer.
- Run installation TriPOS Setup.exe
- In the configuration information screen, enter following information
- Company Name – company name that will be displayed on the device screen
- Acceptor ID – see Prerequisites
- Account ID – see Prerequisites
- Account Token – see Prerequisites
If you do not have the IDs listed above, these can be retrieved by accessing your profile at http://www.coremanagementsystem.com. When logged in, navigate to Virtual Terminal, then click Profile. The codes will be shown in reverse order. The TriPOS service has no visual UI. It runs as a service on the POS computer and starts during Windows log-in.
IMPORTANT: After installation, the TriPOS service will take 15 minutes to update the Verifone device. This process provides no visual feedback onscreen, but it is vitally important not to disconnect your Verifone device for 15 minutes.
Disconnecting the device or rebooting your PC during this process will render it permanently inoperable.
TriPOS configuration file
All the configuration parameters you will need to enter in Erply are stored in the TriPOS configuration file. There will also be default parameters which need to be changed.
This must be done through editing the configuration file in Notepad or similar text editor. The file can be found at it’s default location: C:\Program Files\Vantiv\triPOS Service\TriPOS.config.
On updating a TriPOS version, the new TriPOS is sometimes installed to a different location/directory (For example, “C:\Program Files\Vantiv” or “C:\Program Files (x86)\Vantiv”).
Be sure of the current working directory when reading or editing the configuration file.
Open the configuration file in Notepad. Save the following codes:
- Developer Key
- Developer Secret
You will need these codes to set up TriPOS in Erply.
Begin looking through the code, searching for the following items. Be careful not to make changes other than the ones outlined here.
- Search for the line reading testmode. This will have a default value of true. Change this value to false.
- Not far below this, there will be a line for a Pinpad Idle Message. The default reads as a welcome message. You can add the name of your business to this message, or alter the full text to say whatever you’d like.
- A little further below this will be a line asking if emv is supported. The value for this is default as false, and should be changed to true.
- The next changes are a bit further down the file. Hit Control-F on your keyboard and enter the following: laneid=”1″.
The first will be the COM port. Change this COM port to reflect the port you selected during install (ie: from COM1 to COM9, or whatever you had selected).
5. The final bit of code you need to alter is regarding contactless msd. Find this line and change from the default of false to true.
When you have made these changes, save the file to your desktop as a .config file, NOT a .txt file.
Once you have this on your desktop as a .config file, copy/paste it to the original Vantiv folder.
Access task manager from your computer. Find the TriPOS service, stop it, then start it again. This will refresh the device to pull up the new configuration.
Setup in the Back Office
In this step, you will set up the registers which are going to use the Vantiv TriPOS as the payment provider. Repeat the steps for each register.
- Open Erply back office
- Go to: Retail Chain and click Registers
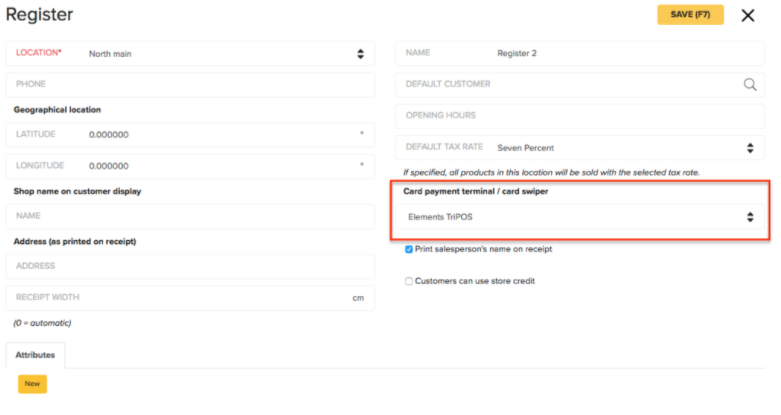
- Select a register to connect the device to
- Change the Card payment terminal / card swiper value to Elements TriPOS
- Press Save
Setup Berlin POS
- In this step you will set the parameters allowing your POS to communicate with the Vantiv TriPOS service. Repeat the steps for each register.
- In the POS Settings, press Payment configuration. You must have admin user rights
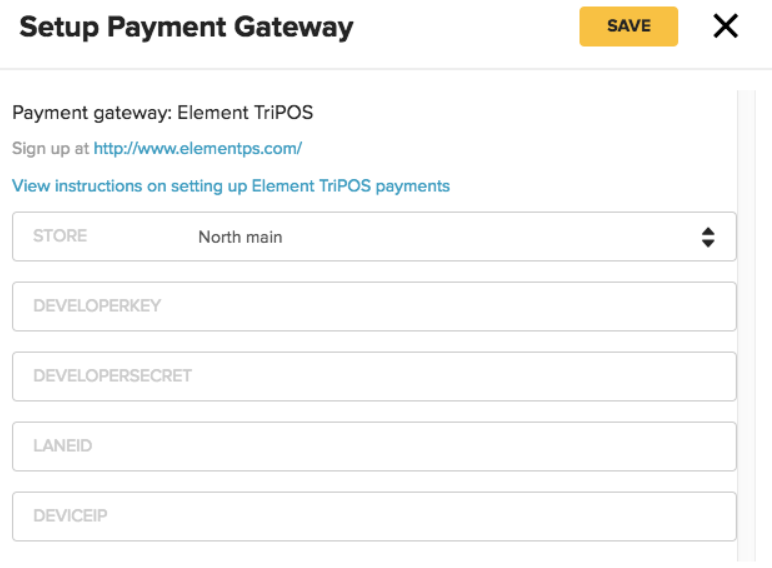
- Click Setup Payment Gateway at the top of the page to pull up the Vantiv/TriPOS form
- Fill in the fields:
- DeveloperKey (see TriPOS config file)
- DeveloperSecret (see TriPOS config file)
- LaneID (set to 1, since this is the default after TriPOS installation)
- DeviceIP (default is localhost:8080; if you chose some other port in step 1, then make sure it’s set there accordingly)
5. Save and reload the POS
Your card reader is now set up in Erply. When the TriPOS device displays your Pinpad Idle Message (see Config), make a test payment and return to confirm everything is working correctly.
Troubleshooting
If payment request does not activate the payment process in the device:
- Check Windows services list to make sure TriPosService is running.
- Check that TriPOS service is reachable on the address and port set in POS.
a. Open the IP address in your browser. If you used the default parameters, then enter localhost:8080 into the browser address bar.
b. If the address is not reachable, double-check the settings in POS. Double-check the Vantiv TriPOS configuration file. Restart the TriPOS service.
c. You can also attempt to use an alternative port. Make the change in POS and in TriPOS configuration file. Example: localhost:6565
3. Check that configuration parameters in POS are correct (see Setup Berlin POS)
4. Check that configuration parameters in TriPOS configuration file are correct.
a. During the TriPOS installation, the installer asks for acceptorId, accountId and accountToken. These parameter values are provided by Vantiv. If you do not insert correct values during the triPOS installation, you must edit TriPOS configuration file later and add correct acceptorId, accountId and accountToken.
b. Double check to make sure the lane ID is correct. Open the TriPOS configuration file. Find section “lane”. Unless you have a good reason, the default value of 1 should be used.
5. Re-install device drivers and TriPOS service.
6. As a final step, contact ERPLY support and make sure you have the credentials and TriPOS configuration ready to be checked by our team.
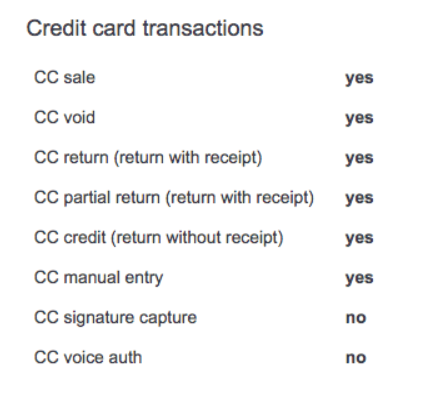
Supported Transactions