Prerequisites
To set up your Erply account to accept payments through TSYS, users must have a TSYS merchant account. The following credentials are provided by TSYS.
MerchantName
MerchantSiteId
MerchantKey
Install files
Device Setup
Verifone MX915 device setup
Connect the payment device to the same local network as the POS terminal
Connect the payment device power cable
Press 0 three times on device keypad
Enter password 9416557
Write down the device IP address from device display
Verifone MX915 device update
Device update may take place automatically, but it’s recommended you do it manually on first install.
Turn on the device
Press 0 three times on device keypad
Enter password 9416557
Press Update
Erply back office settings
In this step, you will set up the registers which are going to use the TSYS (Merchant Warehouse) as the payment provider. Repeat the steps for each register.
Open Erply back office
Go to: Retail Chain and click Registers
Select a register to connect the device to
Change the Card payment terminal / card swiper value to Merchant Warehouse
Press Save
Erply POS settings
In this step you will set the account each register will be connected to as well as the IP address of the payment device. Repeat steps for each register.
Open Erply POS in a secure window.
In the POS Settings, press Payment configuration. You must have admin user rights.
Click Setup Payment Gateway at the top of the page to pull up the Merchant Warehouse form
Fill in the fields:
Store (The Location your register is associated with)
MerchantName (see Prerequisites)
MerchantSiteId (see Prerequisites)
MerchantKey (see Prerequisites)
DeviceIP (see Device setup) – use port 8443 (ex. 192.168.11.118:8443)
Save and reload the POS
Troubleshooting
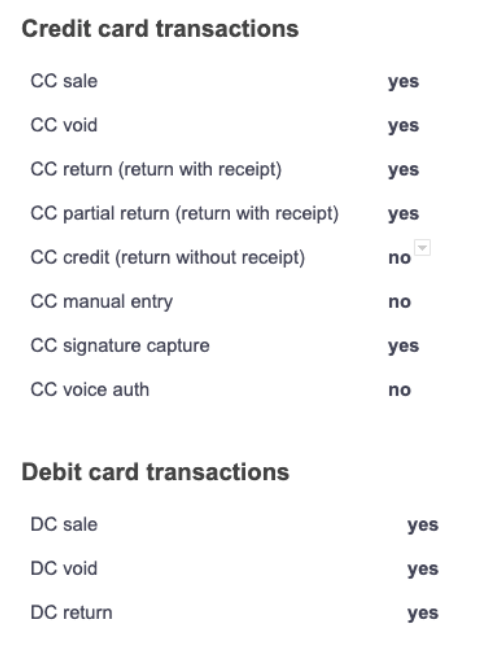
Supported transactions
If device does not respond
Check POS terminal firewall settings and makes sure connections to payment device IP and port are allowed.
Check that the device IP is correct (see Device setup) and make changes from POS settings (see Setup Berlin POS).
Ensure the Erply back office User Group Settings have API checked.
Setting Up a Static IP Address
From the Genius idle screen, reboot the device to access the OS Menu.
Make sure you have your IP address, subnet mask, Gateway and DNS1 from your network administrator for the Genius device to connect to your router/switch.
On the keypad, hold down the 1, 5 and 9 buttons together for two seconds, and then release.
Enter the password 166832 and press Enter.
On the tabs at the top of the screen, touch Administration and then Communication.
From the tabs at the top of the Communications screen, touch Network and then Ethernet.
Press the Edit button.
Select staticIP and touch OK.
Touch the Pencil symbol next to IP Address and use the keypad to enter the IP address assigned to the Genius CED. touch OK.
Configure your subnet mask, Gateway and DNS settings.
Hit Apply
Return to the Genius idle screen
On the Menu path at the top of the screen, touch Home, then touch Run App.
At this point, the unit will have saved configuration and needs to be brought back to the Genius Application.
Select the Home option in the breadcrumbs to go to the main screen
Hit the Run App
The device should take a minute then return to the Genius idle screen. These steps were taken from the Genius Setup Guide.