Sometimes importing products doesn't work and it's difficult to figure out why. Here are some troubleshooting steps.
Upload the File as a Different Format
Erply supports 3 file import types: .csv, .xls, and.xlsx.
.csv: Used for single-sheet uploads
.xls: Used for multi-sheet uploads
.xlsx: Used for multi-sheet uploads
In most spreadsheet editors, you can save your spreadsheet as a different file by going to the File and selecting Save As, Download, or Export.
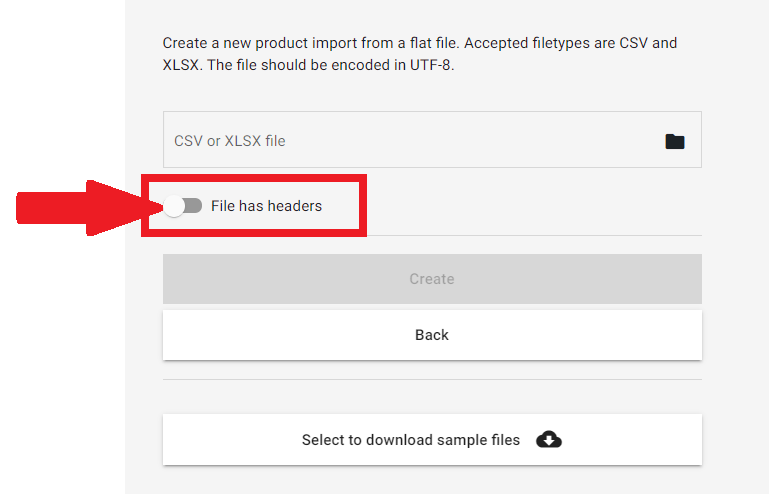
Check if the File Has a Header Row or Not, and Mark That in the Importer Tool
Erply import tools will allow you to select if your spreadsheet contains a header row or not. Ensure that the correct option is checked off.
A header row in a spreadsheet tool is located on row one and contains descriptive information regarding each data column.
An example header row would look like this:
Header Row | First name | Last name |
-- | John | Smith |
-- | Jane | Dough |
Remove All Formulas From the Document
Erply’s import tools will not work properly if a spreadsheet contains formulas, alternate colors, or other automations.
An easy fix is to:
Copy the entire sheet,
Create a new spreadsheet tab,
Paste the values only into the new tab (see more below on this),
Import that sheet into Erply as a .csv
Pasting the values of spreadsheet cells removes all formulas.
In most softwares, this can be done by pressing Ctrl+Shift+V (Command+Shift+V on Mac).
Your spreadsheet edition should have this option by opening the Edit menu and looking for a Paste special or Paste options button. You can also see if the Paste button has an hover-over dropdown menu that allows you to select to paste Values only.
Try a Different Matching Criteria
Depending on the data that you’re importing, Erply gives you different options to identify and match each row by. These are typically used when updating existing records in bulk using an importer tool.
For example, inventory imports have the option to match existing records by a product’s Code, UPC/EAN code, and Name.
You may want to adjust your matching criteria if you’re running into issues.
Note: Only change your matching criteria when it makes sense! If you are changing product names in an import, you will not want to match by Name -- since Erply will be updating those records.
You can find all of the data mapping fields and their uses in THIS article!
Ensure All Subgroup Names Are Unique
This section will break down how to import into subgroups, and how to make temporary unique subgroup names.
Note: product and customer group names are case sensitive!
Import a subgroup
In your import template, you always want to list the intended subgroup endpoint in the customer/product group column.
We’ll show how to import customers into specific subgroups, but this concept applies to product groups as well.
Using the following subgroup structure as an example:
West coast customers → LevelUp Rewards → PC-only
West coast customers → LevelUp Rewards → Xbox-only
West coast customers → Non-loyalty member
An example import template would look like this:
ID | Full name | Group | Notes (not included in template) |
| 001 | Billy Armstrong | West coast customers | Will be imported into the main West coast customers group. |
| 002 | Geralt Rivia | LevelUp Rewards | Will be imported into the LevelUp Rewards subgroup under the main West coast customers group. |
| 003 | Marc Brutus | Non-loyalty member | Will be imported into the Non-loyalty member subgroup under the main West coast customers group. |
| 004 | Luna Lovegood | PC-Only | Will be imported under the PC-Only subgroup under the LevelUp Rewards subgroup under the main West coast customers group. |
Unique names
Here we’ll explain why imports require unique names and what to do when you have one or more groups with the same name.
Taking from the above example, let’s say you have multiple customer groups with the same exact name.
If you try to import a customer into the LevelUp Rewards group, Erply will not know which customer group to upload them to, because two LevelUp Rewards groups exist.
To solve this problem, you must temporarily rename duplicate subgroup names so they are all unique. Here, we might add an E to the LevelUp Rewards subgroup under the East coast customer group, as shown below.
From there you can import customers under LevelUp Rewards E if you want them to fall under the East coast overarching group, or under LevelUp Rewards if you want them to fall under the West coast overarching group.
You can rename a group by right-clicking the group name and pressing Rename.
When you are done with your import, all groups and subgroups can be changed back to their original names.
Remember: When importing customer or product groups and subgroups, the names are case sensitive.