PAX / Heartland Troubleshooting Guide
Microservices
Check if Microservices are running.
Go to Task Manager -> Services Tab and look for “pax-poslink-integration”
Go to Erply Wizard -> Installer App -> Micro-Service Manager -> Pax Heartland
Also check if installer2 Service is running in the background.
- Go to Task Manager > Services Tab and look for “installer2”
If the above-mentioned services are not running, right click on each and select “Start”
IP-Address
Cross match the IP address on the terminal and in payment configuration.
In this step, you can also go through all the configuration to verify if the credit card swiper is properly configured.
- Press F + 1
- 916860 password
- Go to Communication and enter password
- Look for Lan Parameters > ECR communication > Ethernet > Com port > HTTP get
- Lan Parameters > IP address (Provide IP)
- Go to: Communication > Main Communication > LAN
- ECR Type > Ethernet > Comm Port 10009 > HTTP GET
- Make sure to be on *HTTP GET* instead of TCP/IP
- Lan type = Static
At the POS, Go to Settings > Payment configuration and put the same IP address that is configured in the device.
Reinstalling
If still no go - you can proceed to reinstalling the pax microservices
Go to POS Wizard > Installer App > Micro-Service Manager > Pax Heartland > Remove.
Do a hard reload of the page so the wizard will check for the updated files in the directory.
Go to POS Wizard > Installer App > Micro-Service Manager > Pax Heartland > Install latest
Once done with the installation, Go to Installer App > Integrations > POS Tab > Select the correct Register from the dropdown menu > Choose Payment > Terminal > Continue > and put in all the necessary details
Refresh the POS and do a test transaction.
Moneris Troubleshooting Guide
Microservices
Check if Microservices are running.
Go to Task Manager -> Services Tab and look for “moneris-integration”
Go to Erply Wizard -> Installer App -> Micro-Service Manager -> Moneris
Also check if installer2 Service is running in the background.
- Go to Task Manager > Services Tab and look for “installer2”
If the above-mentioned services are not running, right click on each and select “Start”
IP-Address
Cross match the IP address on the terminal and in payment configuration.
At the Credit Card Swiper, press yellow button + 4 to get the dynamic IP.
In this step, you can also go through all the configuration to verify if the credit card swiper is properly configured.
Recommended settings are as follows:
- Integration mode: Direct To Host
- Host: Production
- Host connection: Public(IPGT1)
- ECR Connection: LAN
- Under Configure LAN:
- IP version: IPv4
- IP Address type: Dynamic
- Hit Ok.
- then press yellow+4 to get the dynamic IP
- This is optional in case dynamic didn’t work.
- IP Address type: Static
- Then set IP, subnet mask, and default gateway.
- Hit OK
At the POS, Go to > Settings > Payment configuration > Put the same IP address that is configured in the device.
Note: In this step, you can also verify if the payment configuration is properly configured. Please see steps outlined below.
In POS, navigate to the Settings -> Payment Configuration -> Setup Payment gateways
Choose moneris as the current Integration from the dropdown. Several options appear, where it is required to enter data about the terminal, for it to establish a connection with the terminal.
- Connection type: Ethernet
- Device timeout: 120
- IP address (press yellow+4 to get the dynamic IP)
- Port 9599
- Terminal ID (Provided by the terminal provider)
- Merchant ID (Provided by the terminal provider)
Reinstalling
If still no go - you can proceed to reinstalling the pax microservices
Go to POS Wizard > Installer App > Micro-Service Manager > Moneris > Remove.
Do a hard reload of the page so the wizard will check for the updated files in the directory.
Go to POS Wizard > Installer App > Micro-Service Manager > Moneris > Install latest
Once done with the installation, Go to Installer App > Integrations > POS Tab > Select the correct Register from the dropdown menu > Choose Payment > Terminal > Continue > and put in all the necessary details.
- Connection type: Ethernet
- Device timeout: 120
- IP address (press yellow+4 to get the dynamic IP)
- Port 9599
- Terminal ID (Provided by the terminal provider)
- Merchant ID (Provided by the terminal provider)
Refresh the POS and do a test transaction.
NOTE: It is very important in Moneris integration that the terminal is pre-activated before you use it.
Once Terminal ID and Merchant ID is supplied under payment configuration, Please hit the button “Activate terminal” and it should prompt them in the actual card reader.
Swedbank-Ingenico Payment Troubleshooting
Network
Make sure that the payment terminal and the computer are in the same network.
Microservices
Are Microservices installed to the machine? Please see THIS guide to see how to install microservices and THIS guide on how to install the Swedbank-Ingenico Microservice.
Check if Microservices are running.
Go to Task Manager -> Services Tab and look for “swedbank-ingenico”
Go to Erply Wizard -> Installer App -> Micro-Service Manager -> Swedbank Ingenico
Also check if installer2 Service is running in the background.
- Go to Task Manager > Services Tab and look for “installer2”
If the above-mentioned services are not running, right click on each and select “Start"
IP-Address
Cross match the IP address on the terminal and in payment configuration.
If you’re using ICT220 Series of terminal, you can find the IP by following these steps:
press F -> Parameters/parameetrid -> View/vaatamine -> Terminal -> Peripherals/lisaseadmed -> Ethernet to get the IP.
If you’re using Desk/3200 series of devices:
Press the white button on the left-hand side of the terminal (with a circle on it) -> “Tööriistad” -> “HW Konf”. You will see the IP as the third line, starting with “IP”
In POS, navigate to the Settings -> Payment Configuration -> Setup Payment gateways
Choose Swedbank Ingenico as the current Integration from the dropdown.
At the POS, Go to > Settings > Payment configuration > Put the same IP address that is configured in the device.
Once the IP has been changed under Payment Gateways, click on save and then cross and then make sure that the connection in the upper right corner (three green connectors) goes yellow and then green again.
TSYS / Cayan Payment Error Troubleshooting
Microservices
Check if Microservices are running.
Go to Task Manager -> Services Tab and look for “cayan-integration”
Go to Erply Wizard -> Installer App -> Micro-Service Manager -> Cayan
Also check if installer2 Service is running in the background.
- Go to Task Manager > Services Tab and look for “installer2”
If the above-mentioned services are not running, right click on each and select “Start”
Credentials
- Under the POS settings -> Payment Config -> Setup payment gateway, make sure that all the credentials provided by Cayan have been entered accurately.
Cayan usually send an email to customers with their credentials, you can copy paste credentials from there. - User needs enough access right to get to the Payment configuration in the POS settings.
Device IP and port
- Under the POS settings, make sure that the device IP address is correct.
- Users with lower access level may be able to enter the IP address under POS settings -> External Device Integrations. (in some agents' experience, adding the IP address under EDI might not actually add the IP address in the gateway settings)
Getting the device IP address
- On the credit card machine, ask client to type “000” and enter the password “9416557".
- You may need to set up a static IP address for the credit card machine, using Google DNS – 8.8.8.8, 8.8.4.4. This needs to be done on the credit card machine.
Open a command terminal:
- For Windows, type “cmd” in the windows search bar
- For Mac, type “terminal” in the search bar of the launch pad
Type the “ping [IP address]” and press enter.
If the ping fails with both methods, then that means that the POS is not communicating with the credit card machine.
- Under the Cayan device settings:
- Select network
- Check the device has an IP address and take note
- Select test and ensure all 3 tests are passing and passing quickly – a delay of 10-30 seconds can point to network issues.
Firewall
On the POS computer, check the firewall settings to make sure that connections to payment device IP and port are allowed.

If instead you are getting “connection timed out/site cannot be reached”, this could point to a network issue at some point between the computer and the terminal.
Switch to Chrome browser
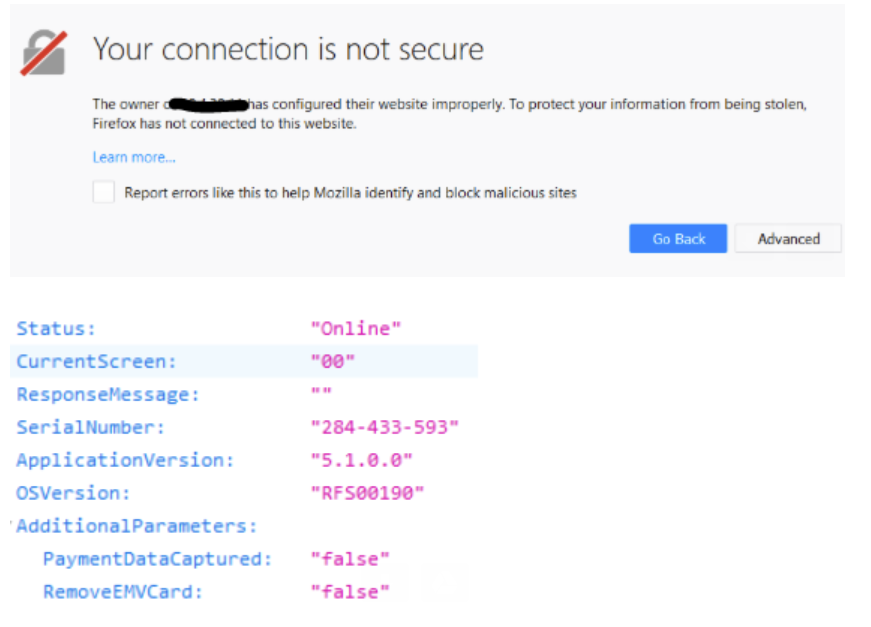
In some cases, the Cayan certificate doesn’t get trusted on Firefox and prevents the connection between the POS and swiper.
In that case, try uninstalling the certificate and reinstalling on Chrome, pinging the swiper in Chrome, and running a test sale there.
Credit card machine
- Reboot the terminal.
- Check wire connection, that the right slot is being plugged. Sometimes, after reboot, the terminal will go through an update.
- To update the terminal:
- Press 0 three times on payment device keypad
- Enter password “9416557”
- Press button “Update”
- To update the terminal:
Transport key
Does Erply receive a transport key from Cayan server?
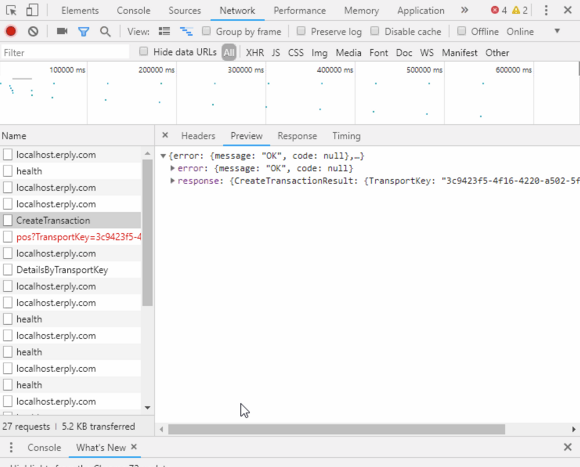
- Using Chrome, right click and select "Inspect"
- In the inspector, open up the “network” tab.
- With that open, try to conduct a sale and see what requests are being sent out.
- One should be "CreateTransaction" and getting a response with the transport key. If you can see the transport key in the preview tab, that means Erply is receiving a transport key from Cayan.

Does the transport key received by Cayan get rejected by the terminal?
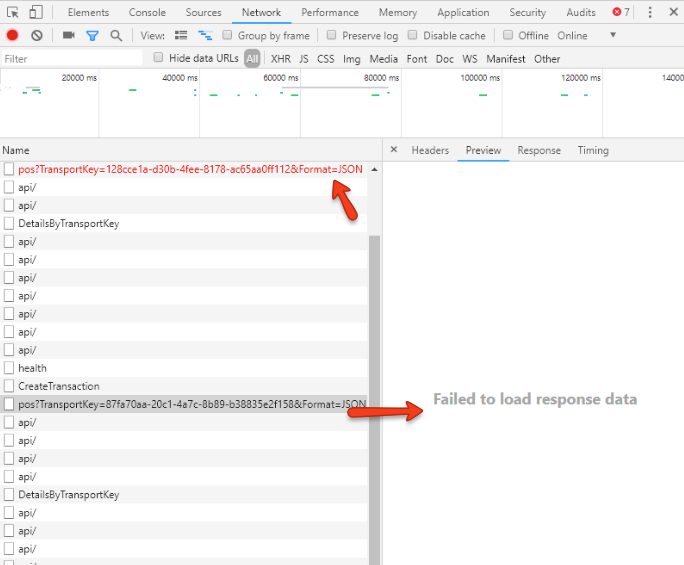
Still using the inspect tool under the network tab, a rejected request will be displayed in red.
Moreover, the preview tab will show “failed to load response data” if the transport key doesn’t get to the credit card machine.

If it goes through but the transport key is not valid, the preview tab will show the response from the terminal with an error message “invalid transport key”
Contacting Cayan
You may need to contact Cayan, for example, to check that credentials are correct or to verify if Cayan is receiving transport requests.
Cayan can check the credentials for a specific device by asking the device serial number.
Cayan support line: 888-249-3220