Benefits of Matrix Products
Simplify complex inventory structures
Organizing inventory into matrix products saves your team time and effort by quickly creating SKUs based off a product’s main characteristics.
A store might sell a t-shirt that comes in 3 different sizes and 5 different colors. Rather than creating 15 different products in the back office, matrix products enable you to generate 15 SKUs with the click of a button.
Common matrix values: Style, color, flavor.
Speed up POS navigation
A matrix inventory structure keeps lines moving as quickly as possible for manual employee checkouts and customers self-service stations. By grouping similar matrix items together, you can create an intuitive interface for your POS users to navigate.
Stronger inventory insights
Reporting on specific matrix product values helps you better understand sellthrough rates across your retail business. With matrix products, you can see how many size 7 blue sneakers you sold compared to size 7 black sneakers, or size 9 black boots -- all at a glance.
Create Dimensions
You need to create matrix dimensions to create matrix products. You only need to do this once; Erply will remember all dimensions for future matrix products.
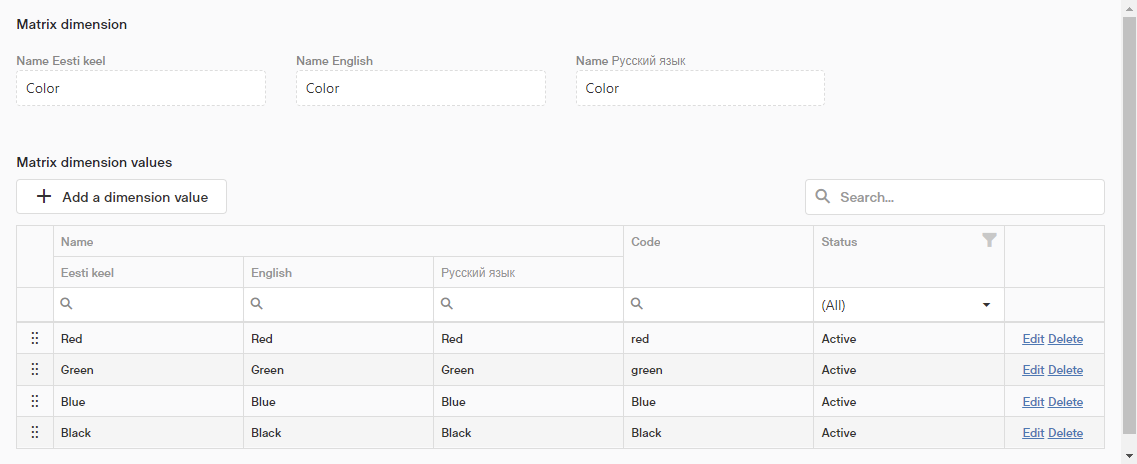
In the back office, navigate to PIM -> Manage Product Catalog -> Matrix Dimensions. Click on Add a dimension to do just so.
Give your dimension a name and status and click Save.
Define the variations by adding the values.
Each variation must have a Name and Code before being added.
You can change these at any time by clicking on the Edit button.

Now that we have created a new dimension and defined variations to it, we are ready to create a parent product.
Create a Parent Product
Make sure that product groups for this product are built out in the most ideal manner for your inventory structure and product setup.
Create a new product in PIM -> Manage Product Catalog -> Add a product.
Fill out the appropriate information such as Name, Product Group, Price, etc. Make sure to place the product into the corresponding product group which was previously created.
Change the Type from Product to Matrix.
Click Save Product.
Generating Children Products
Go on your parent product's product card and click on the Matrix button on the side menu.
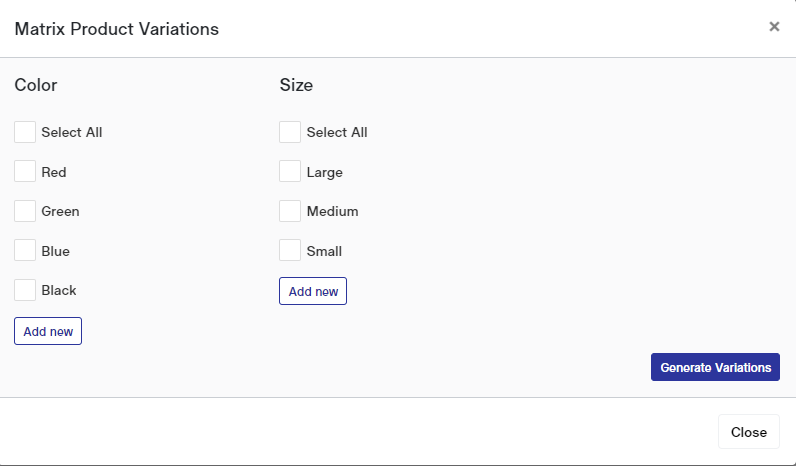
Click the Add New Variations. You can generate up to 3 matrix variations.

Select each dimension used for this specific product in the drop down menu, then click Generate Variations.
Once the generation is complete, you will see a list of all the variations. Check the boxes of all variations that you want to create.
Review and approve the changes. Uncheck boxes next to any variations that you do not wish to add.
You have successfully created the Matrix “children” (sizes & colors) of this “parent” product.
Once approved, you will be able to view your each child product under the Matrix tab. You can click on the edit button to open the child products Product Card.
Each child product will be given a unique code. This code is the parent product followed by the dimension. In the first example it is (123456794), followed by the color (RD), and then the size (L).
Update Inventory
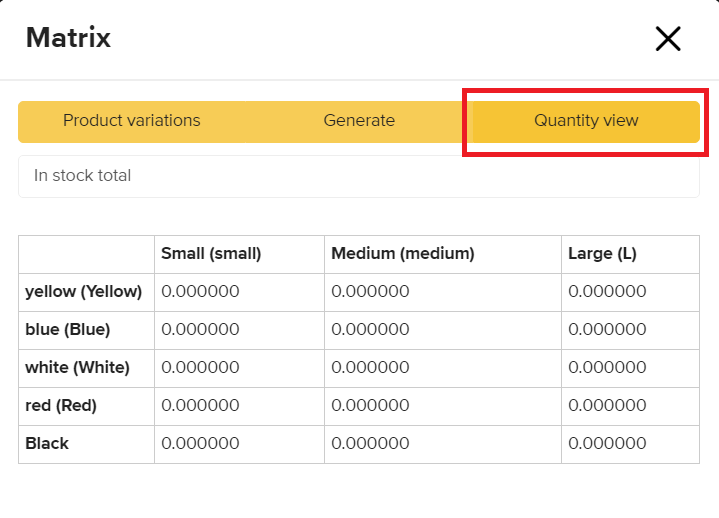
This part is more comfortable to do in the old PIM. Navigate to PIM -> Products and open parent product. Click on the Matrix button in the bottom menu bar.
Switch the view from Product Variations to Quantity View.

Drom the dropdown menu, select what you'd like to edit.
Note: You cannot change the stock levels from Stock totals. In order to change stock levels, you must select a specific Location. Here, you can change the available amount, choose a reorder point, and a restock level.
To add EAN/UPC codes, select UPC CODE from the Quantity view dropdown You can manually input the UPC code, or scan them in.
The Matrix Dimensions are now applied.
All products are now added to system and ready to be scanned (if EAN code was added) at the POS view.
Matrix main product has stock levels?
You can see that your matrix main product has stock levels, but none of the variations have any stock. Or you can see that the Matrix product stock level is higher than all variation stock added up. Here’s an explanation on how this can happen, and how to solve this.
What is causing this?
Often people sell one product as a single product and at some point change that product type to a matrix product, to now add some different variations. You should never do that. If you have sold one product, and now want to change it to a matrix, you should archive the original product and create a new product for Matrix. That way it doesn’t mess with the history of the single product.
When just changing the type of the product the stock levels will stay under that product, but as you can not sell the matrix main product the stock levels will stay stuck. The stock will appear on all reports that include stock levels.
How to write-off the stock levels under the Matrix product?
When this has happened on your account then this is how you can solve it:
- Open the Matrix main product, change the Type back to Product and Save.
- Create an Inventory Write-Off for that product, with the quantity of the stock level that it has.
- Save the inventory Write-Off.
- Open the product card and change the type back to Matrix product and save.
After doing those four steps the stock levels that were under the product before will now be written off.
Note! We would still recommend creating a new product for Matrix not using an existing single product.
Frequently Asked Questions
Can I import matrix products to Shopify?
While you can assign unlimited matrix variation values to a product in Erply, Shopify only lets you import 100 variations values.
Take this into account when exporting data into your Shopify store.
I want to change a dimension's value's name only for a few products, not all.
If you need the value to be a totally different color or not for all products that have this value, then you would need to archive the existing product and create a new variation under the matrix with the right color. The name can only be changed for all the products with that value.