Sales Import Sheet
The format of the file to import sales documents should be the same as in the sample file, which you can download from HERE. File format must be CSV.
The following columns are required:
- Product ID (A) = Product code
- Amount (D) = Product quantity per product
- Retail price (excluding VAT) (F) = Product price without VAT per product
- VAT% (G) = VAT rate per product
Other information is optional. If the table contains the attention to be added to the system, it is also necessary to add the product group (Product group (C)) and, if desired, the product name (Product name (B))

Order of the columns needs to be following:
- Column A - Product Code
The Importer will look for products according to this value, if the value is misspelled or does not exist a new product will be created. - Column B - Product Name
If the code is correct but the name is misspelled then Erply adds the matching name it can find from the product database based on the code. If code is missing the name will be added to the new product. - Column C - Product Group
If the code is correct but the product group is misspelled then Erply adds the matching Product Group it can find from the product database based on the code. If code is missing the system will check if the group exists and adds it to the new product. If the group does not exist a new group will be added. - Column D - Quantity
Amount of products sold on certain period. No symbols or letters allowed! - Column E - Price with Tax
Single unit price with VAT/Tax included. No currency symbols allowed, separator needs to be “.” - Column F - Net Price
Single unit price without VAT/tax. No currency symbols allowed, separator needs to be “.” - Column G - VAT/Tax
VAT/Tax needs to be predefined in the Back Office first. Name of the VAT/Tax in the Back Office needs to be the number of the percentage and % sign (for example: 20%; 10%; 5%). If you plan to use a new VAT rate, first add it to the Back Office under Settings -> Set Up Tax Rates. - Column H - Unit net total sales value
Net Price x Quantity.
No currency symbols allowed, separator needs to be “.”
Starting a New Sales Import
In the back office, navigate to Sales -> Import Sales Documents -> Create New to start your import.
Fill out the following information:
- Select file: Choose your import file. It must be a .csv
- Warehouse: The location you want to upload the sale to
- Currency: The currency that sale was made in
- Date: The date the sale was made
- Notes: Important notes regarding the sale.
Then click the Upload & Import button
When the importer detects the products on the document, the following text is displayed: “All products in the import were successfully found. Please confirm to start the import”. The option to Cancel or Start import is displayed.
If the product is not Erply, the following text is displayed: “The following products in the import cannot be found. Do you want to create them? ”. The corresponding sentence indicates that the following products were not found from Erply and suggests whether you want to add them as a new product to the system.
There are 3 options:
- Cancel
- Import with existing products only
- Import and create missing product
Import will result in an invoice-waybill with the selected date. Inventory transaction date occurs as today and it cannot be changed.
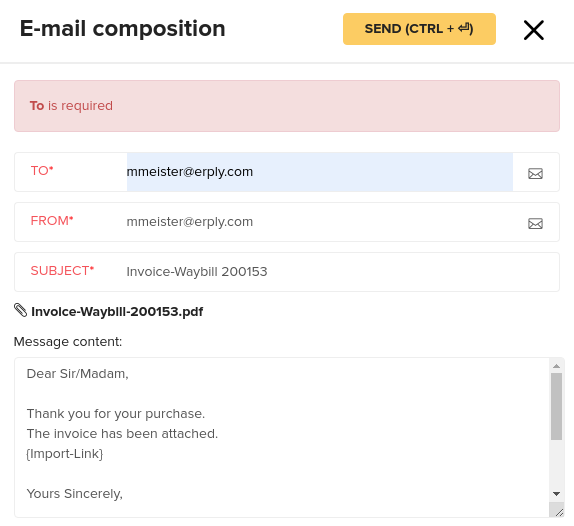
Import Link in Email
It is possible to easily transfer sales and purchase documents between two Erply accounts using the import link. By clicking on it, it is possible to import documents to Erply.
The formula for it is {Import-Link}. This should be included in the message when the document is sent by email. {Import-Link} can be added manually every time it is needed when sending an email.
Second option is to add it to the default message. This can be done by going to Settings -> Configuration -> Sending invoices by e-mail.
It is possible to import sales and purchase documents
Sales Order -> Purchase Order
Invoice-waybill -> Purchase Invoice
Use case would be:
You create a purchase order when you send it, then the other party imports it as a sales order document. Then they will make an invoice and send it back, when importing it now it is a purchase invoice. This would formalize the documents on both sides.
Clicking on "Import to Erply" in the received email will open the Erply login window, where you must log in to import.