Swedbank integration is used in Estonia and supports Ingenico terminals.
In order to use the Swedbank integration with Erply you need to install the Installer app on your computer and configure the microservice.
Here is the list of the terminals supported by Swedbank integration:
- Move/3500
- Move/3500 & iPP 315
- Desk/3200 & Desk/1500(or 1600)
- iCT220 & iPP 310
1.Install the Installer App
To make the microservice run on the POS, we need the Installer App to be installed and running. Check out the guide for that here.
2.Connect the terminal with your computer
Before beginning any setup processes, connect the terminal to a power outlet and ethernet port.
Now, if the terminal is connected to the internet and powered on we will take the next step.
Important: make sure that the payment terminal is in the same network as the computer is!!!
3.Set up the Swedbank Ingenico micro service in Wizard
From the Wizard, choose Hardware -> Installer App -> Micro-service Manager.
After which it'll display Add new micro-service where you can choose any payment integration.
Once payment integration is selected - press Continue (green button).
After that the payment micro-service view is displayed.
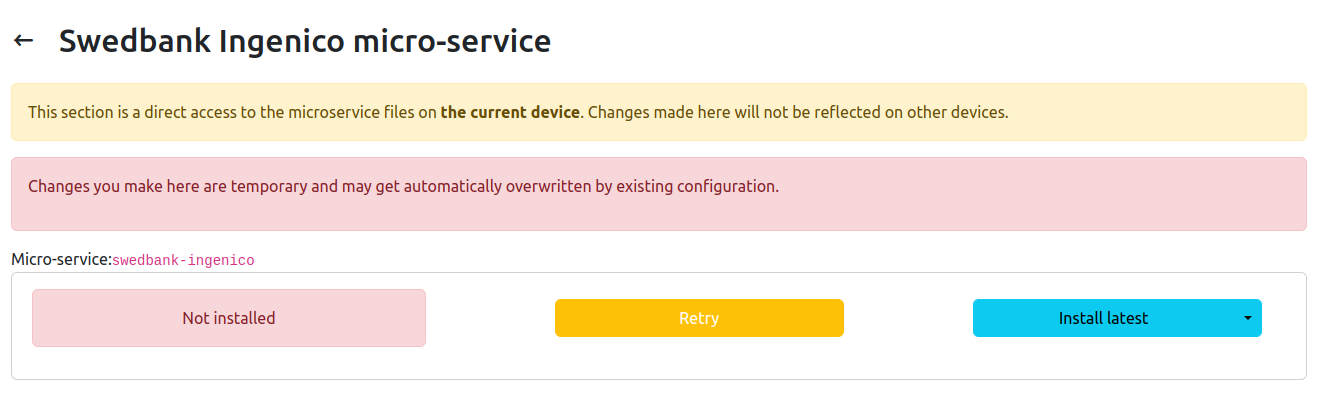
Click on the blue Install latest button.
Then you will see the micro-service configuration view.
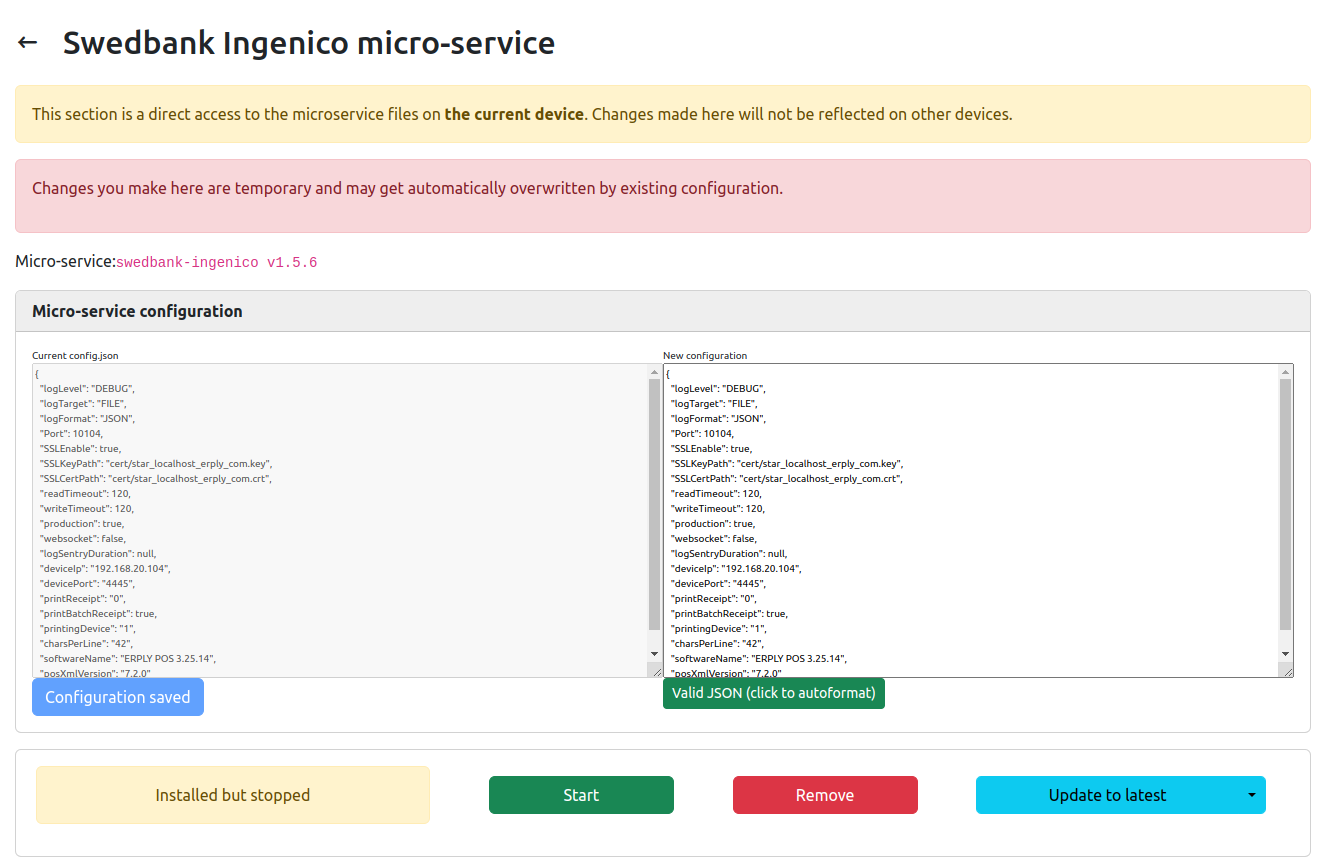
Click on the green Start button. After that the button should become “Stop”. If it is not, please click on the Start button again.
Once you see the ‘Stop’ button instead of ‘Start’ - it means that the payment micro-service is now running!
4.Integrating the Payment terminal in Wizard
Navigate to the Hardware -> Integrations and choose if you want to connect the terminal to the company, warehouse or cash register.
Select needed company, warehouse or POS from the dropdown list
Click on the Payment Terminal button
Press green Continue button below.
Under the Available integrations, choose needed payment integration.
If the needed payment micro-service is not displayed there then select it from the “Add New Integration” list:
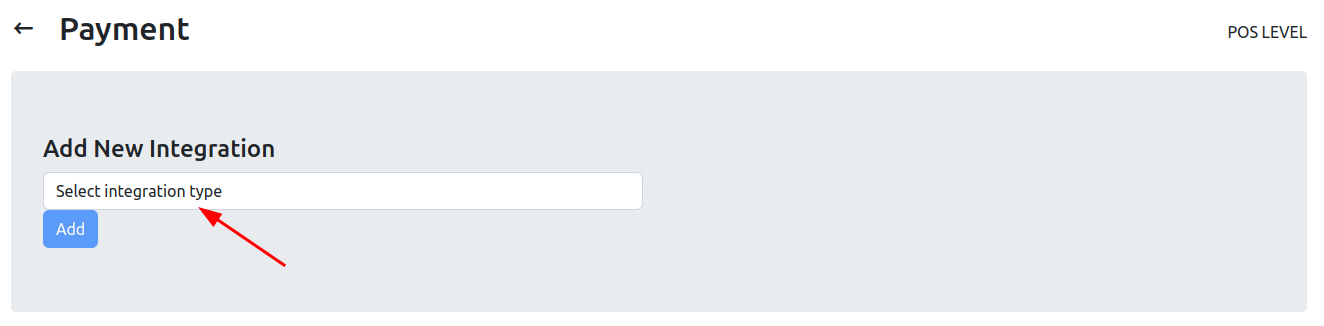
Once the needed integration is selected, click Add. Now you see the view for terminal configuration.
Fill your terminal IP into Device IP field
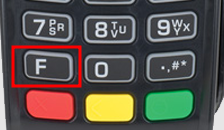
The IP address can be checked in the terminal. Click on the white button with black dot inside it.
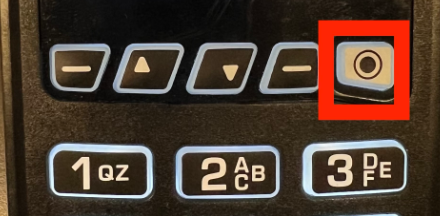
If there is no such a button please press F button:
Press “1” on the Terminal (Option 1 - Tools)
Press “1” on the Terminal again (Option 1 - HW conf.)
IP is shown in the “IP:” section (the long number like xxx.xx.x.xxx)
Go back to the Wizard.
Enter the Device Port - 4445
Select which receipts the terminal should print for you: Merchant and Customer, only Merchant or None.
In the last field please select the Internal terminal printer.
Press Save
5.Configure Swedbank integration at the Brazil POS
When you've finished setting up in Wizard, navigate to the Brazil POS https://epos.erply.com/
Click on the cog button from the POS menu bar.
Open POS Settings -> Payment configuration -> Setup Payment gateways and check if the needed payment integration is selected (if not please select it from the Select current integration dropdown list):
Check that Allow fallback to external integration box is ticked (if not please check it!). Read more about it in this article.
Make sure that other fields are filled! If not, pease fill them!
If everything is filled and correct, please click Save to save configuration.
Just in case, refresh the POS page - click ‘refresh’ button next to the URL.
Make a test sale using a card payment in order to make sure that payment micro-service is running and a payment terminal is properly configured and connected with a POS.
Receipt printing via Swedbank Ingenico terminal
In order to setup receipt printing via Swedbank Ingenico terminal please follow steps in this article.
Frequently Asked Questions
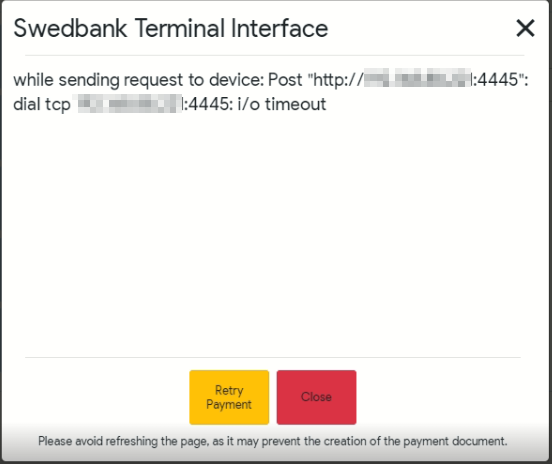
I am unable to make sales with Swedbank integration. I see the following error in the payment modal:
“while sending request to device: Post ”http://xxx.xxx.xx.xxx:4445":dial tcp xxx.xxx.xx.xxx:4445: i/o timeout"
How can I resolve it?
This error in the payment modal means that your POS system does not have connection with a terminal.
Ways to solve the conncetion issue:
- Check the terminal IP address on the terminal and compare it with one that was added in the POS Payment Configuration (POS Settings -> Payment Configuration -> Setup Payment gateways -> Swedbank:Ingenico). Afterwards please click on the “Test connection” button. If there will be a message “Connection OK” it means that connection is back and you can proceed with sales. If you still see “Unable to connect” please try another ways to solve it.
- Unplug the terminal cable and plug in back. Once terminal is ready to use go to the POS Settings -> Payment Configuration -> Setup Payment gateways -> Swedbank:Ingenico. Please click on the “Test connection” button. If there will be a message “Connection OK” it means that connection is back and you can proceed with sales. If you still see “Unable to connect” please try another ways to solve it.
- Check the integrations indicator from the POS header menu (three cables icon). It should have green color. Click on it. Please find the Swedbank Igenico integration from the list. Check the Status column - download and turn on icons shoud be green(in this case please try other ways to solve the intial conncetion issue). If the turn on button is grey it means that the Swedbank microservice is stopped. Please follow the steps from this article part to solve it.
- Contact your bank and terminal provider! Let them check on their side. If the issue still exists, please contact ERPLY support team.
I get the “EOF” error in Brazil POS. The document in the POS is not created, however payment was successfully done and payment receipt is printed out. What happened?
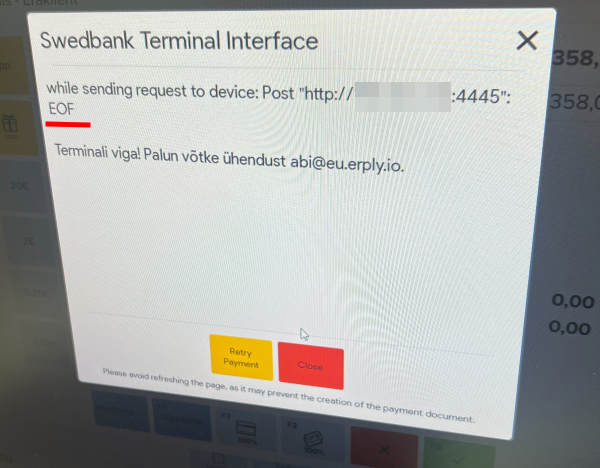
“EOF” means “end of file”. The POS shows this error when the terminal has sent an empty payment file to the ERPLY Swedbank Ingenico microservice. The microservice can not forward an empty payment file to POS.
The POS always creates a document based on the payment info. If the payment info is empty, the POS unable to create a documement.